Summary
To create a navigation menu, first set it up in your WordPress dashboard by adding and organizing menu items. Now, open your page in Elementor and insert the RAE Navigation Menu widget.
After that, simply select your menu from the dropdown and customize its layout and styling to match your website design.
Do you want to create navigation menu with Elementor for your WordPress site?
Menus are critical elements of a website, regardless of the type and industry it represents. Apart from the presentation, you must also consider navigation and user experience when designing this element.
When visiting a site for the first time, almost 38% of customers look at the layout or navigational links of the page. Thus, visitors will not take a second before jumping off if the menu is hard to find.
Keeping this in mind, while creating an eye-catching and attractive menu is essential, it could be a cumbersome task.
If you think you are stuck in the loophole of creating a navigation menu with Elementor, this post will help you.
Let’s find out more here!
Responsive Addons for Elementor is the Best Elementor Addons plugin – Get it for free!
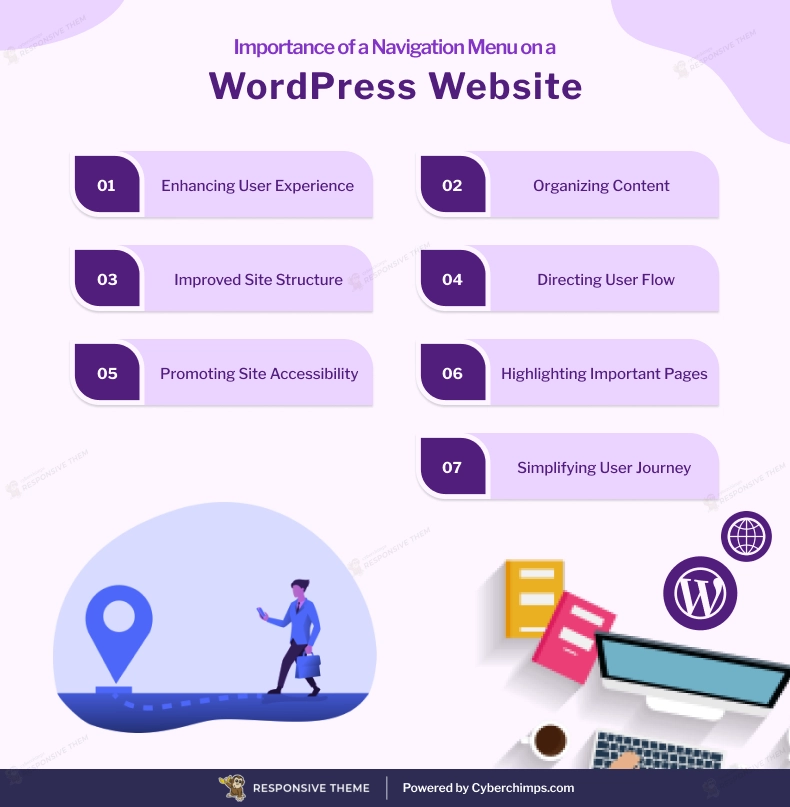
Why Navigation Menus Are Important for Websites
The following are the important aspects of a WordPress navigation menu:
How to Create a Navigation Menu in WordPress
Jotted down below are some easy-to-follow steps to create an Elementor navigation menu in WordPress.
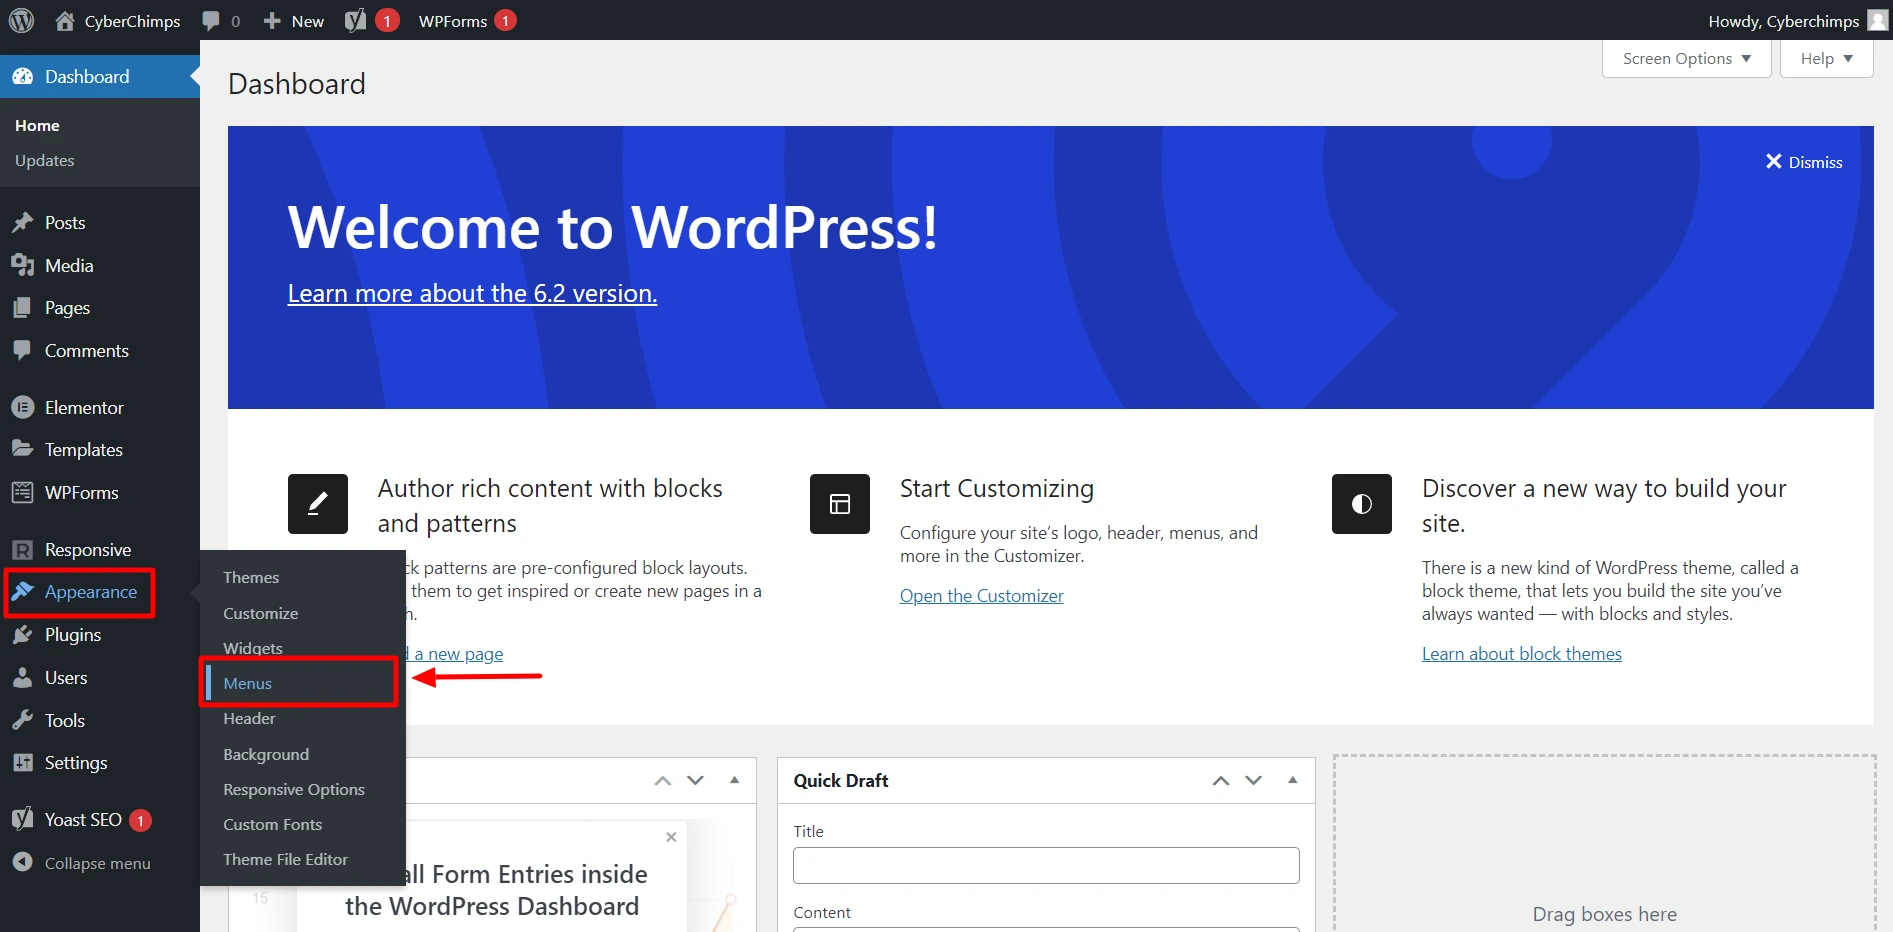
1. Open your WordPress dashboard, and on the left side, hover your cursor on Appearance and click Menus.
2. Once here, you can either create a new menu or choose from the pre-built ones. If you choose to go with the former option, follow these steps:
3. Click the Create a new menu option.
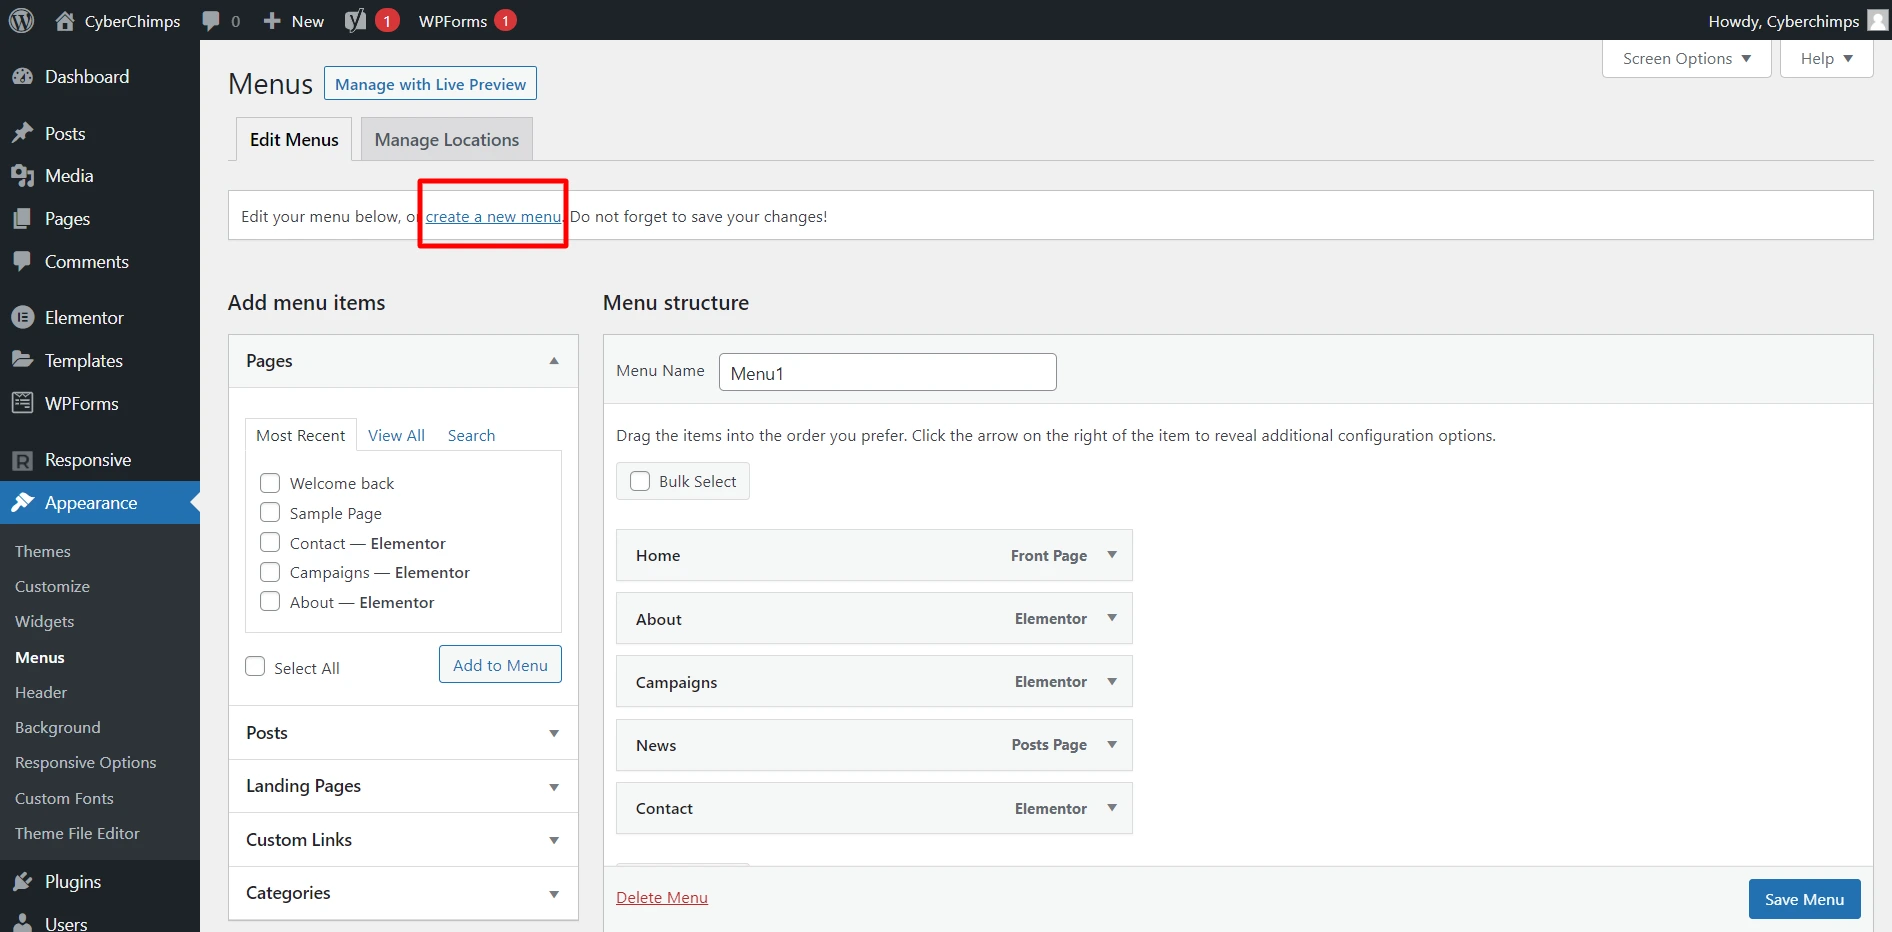
4. Now, give a name to the menu and add items from the left side of the page.
You can select from categories, custom links, posts, and pages.
Choose the items according to the performance.
You can also create multi-level submenus by dragging the menu items to the left and right.
5. Next, click the Save Menu button.

And you are done with creating a navigational menu.
You can also create multiple menus by simply clicking the “create a new menu” link above the Menu Structure.

Best Elementor Plugin for Navigation Menus
If you have been in search of some of the best add-ons for your WordPress, try out the Responsive Addons for Elementor plugin by Cyberchimps.
Responsive Addons for Elementor Plugin
Designed by an excellent team of developers, this plugin offers more than 80 widgets and 150+ ready-site website templates.
Let’s dive deeper and find out more about this plugin through these features:
An Array of Widgets Available
This plugin allows you to access an array of widgets, whether you want to add a testimonial slider to your site or showcase a pricing table.
Each of the widgets has been categorized accordingly. Some of the top categories you can find here are content, form, SEO, posts, marketing, WooCommerce, and creativity.
Inbuilt Theme Builder
The plugin comes with a Responsive Elementor theme builder add-on.
This feature allows you to effortlessly create and edit the primary elements of your entire website, including pages, posts, menus, footers, headers, 404 pages, global archives, and more.
More than 150 Pre-Built Templates
If you are designing a WordPress website from scratch, this add-on plugin could be a lifesaver. It backs up more than 100 ready-to-use Elementor templates.
Using these templates is a breeze. Choose one template, import the demo, add content according to your preference, and launch the website.
Improves the Performance of your Website
This is a lightweight widget and add-on that you can easily use. Through this plugin, you can enable or disable specific sections or elements from the panel.
This way, you can enhance the performance of your website to a great extent.
???? My Real-World Test Results:
- Number of widgets: 80+
- GTmetrix Performance Score: 100%
- Includes Cross-site Copy-paste feature
- 5+ Extensions like Scroll animations, Sticky Section, Page Duplicator, & more.
- Save design time with 100+ Premium-grade Starter templates
How to Add a Navigation Menu in Elementor (Step-by-Step)
Before getting down to the guide, make sure that you install the Responsive Addons for Elementor plugin to access this widget. This Responsive Addons For Elementor Nav Menu widget lets you create and customize menus on your WordPress website.
Here is the step-by-step guide:
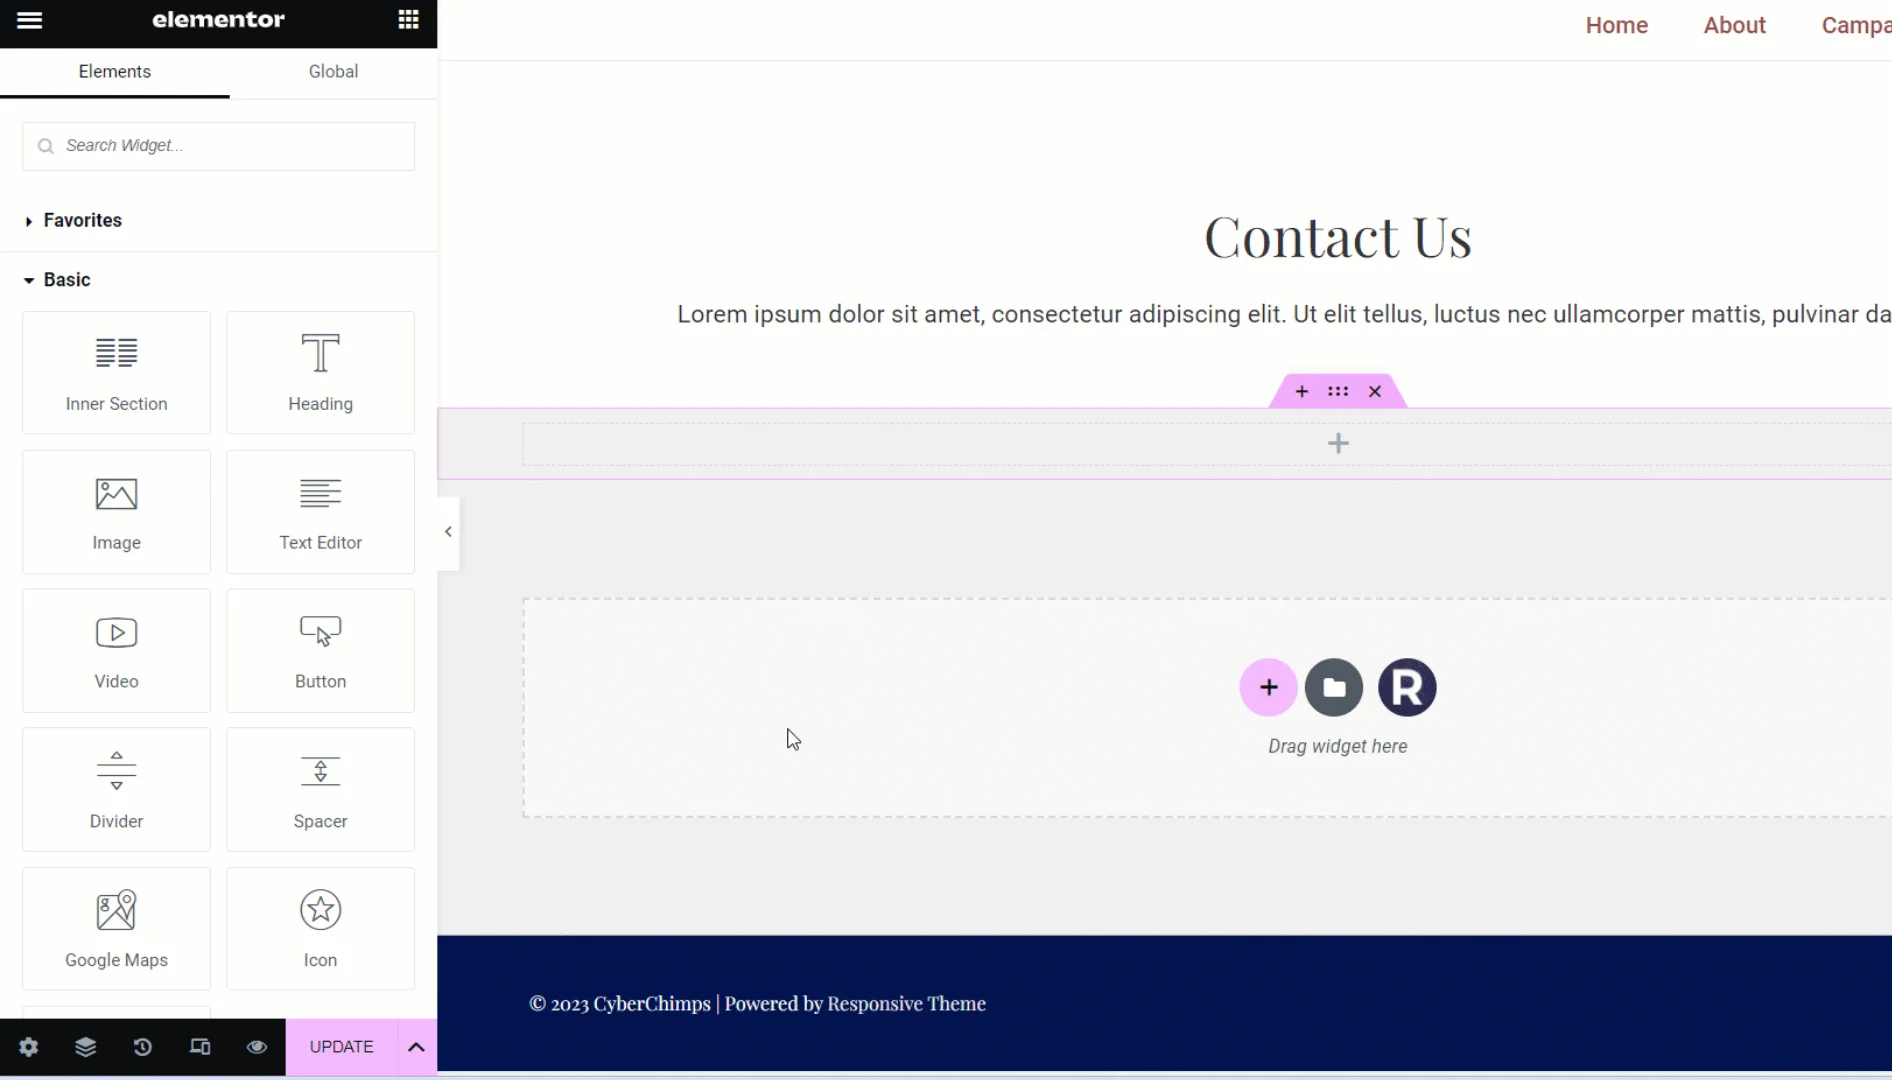
Step 1: Drag and Drop the Widget
Search for REA Nav Menu and drag and drop the widget onto your header.
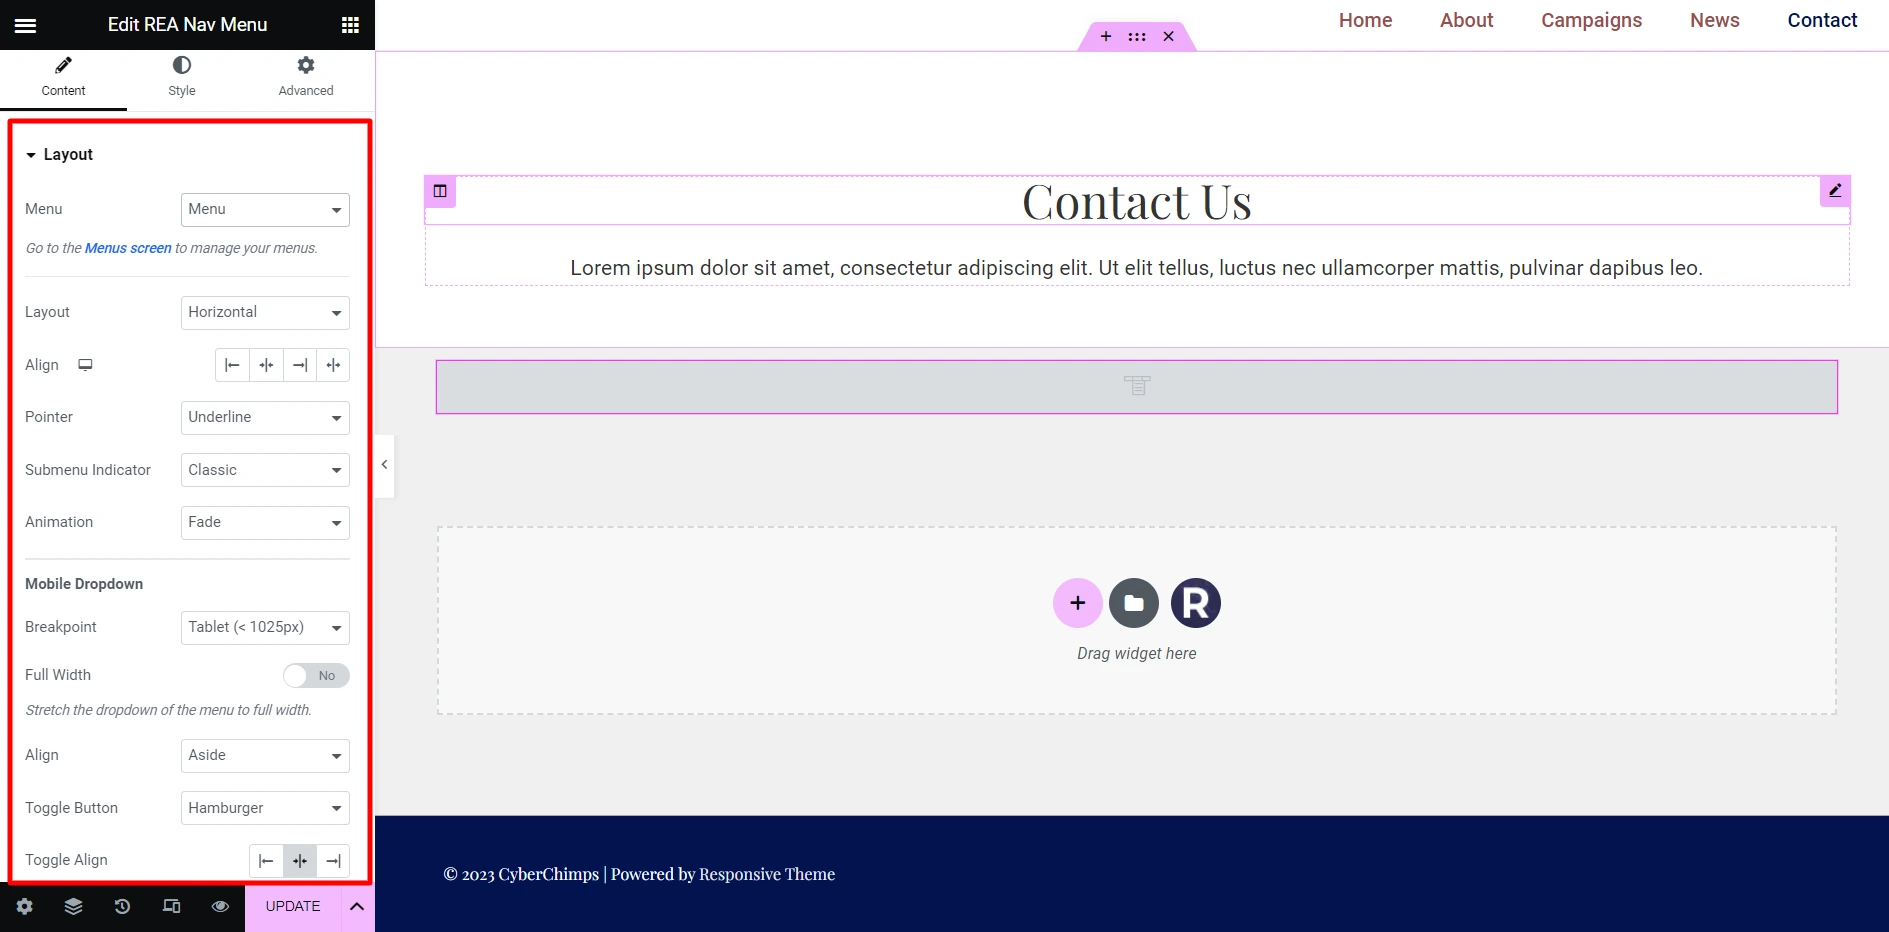
Step 2: Select the Menu
After inserting the widget into the header, click on the edit button. Under Content > Layout > Menu, click on the dropdown to choose the menu you want to display on the website.
As previously discussed, you can create multiple menus under appearance > menus; from your WordPress dashboard.

Step 3: Customization Options in the Navigation Menu Widget
If you would like to customize the items in your menu, the below-mentioned fields will help you out:
- Content
Under the content section, you can find a variety of features and functionalities, such as:
| Layout | – Menu – Layout – Align – Pointer – Submenu Indicator – Animation |
| Mobile Dropdown | – Breakpoint – Full Width – Align – Toggle Button – Toggle Align |
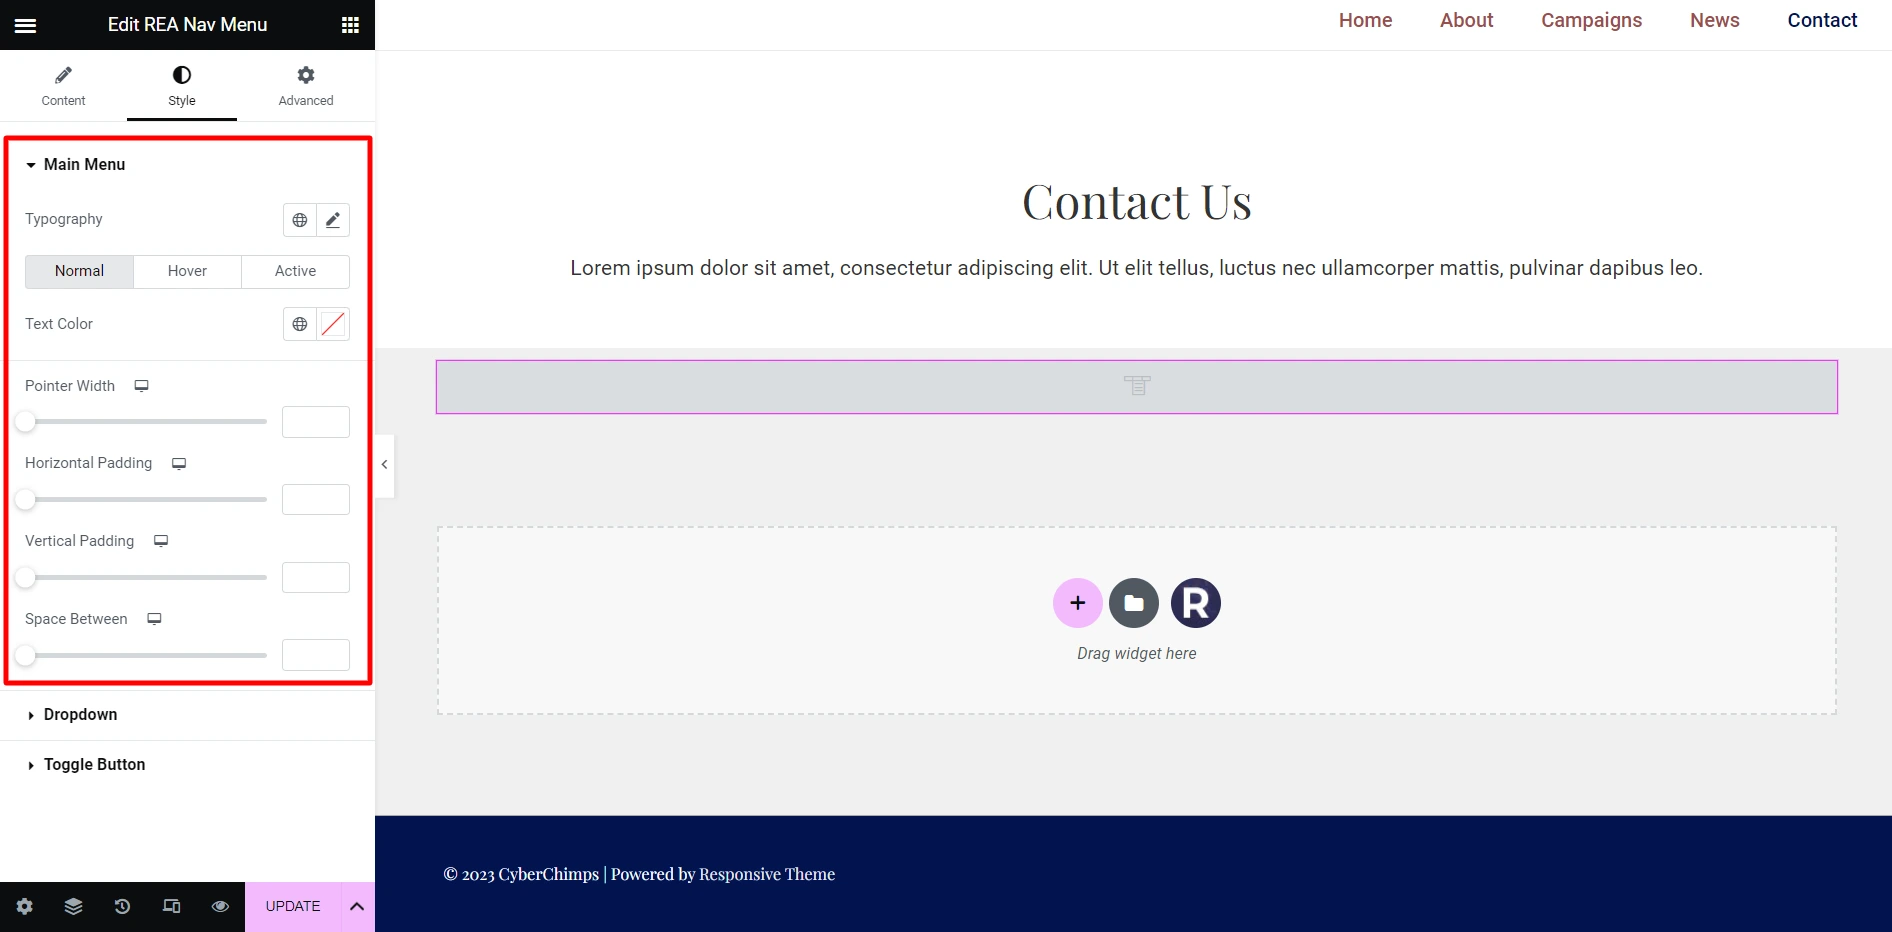
- Style
Under the style section, the features and functionalities that you can find are:
| Main Menu | – Typography – Text Color – Pointer Color – Pointer Width – Horizontal Padding – Vertical Padding – Space Between |
Dropdown:
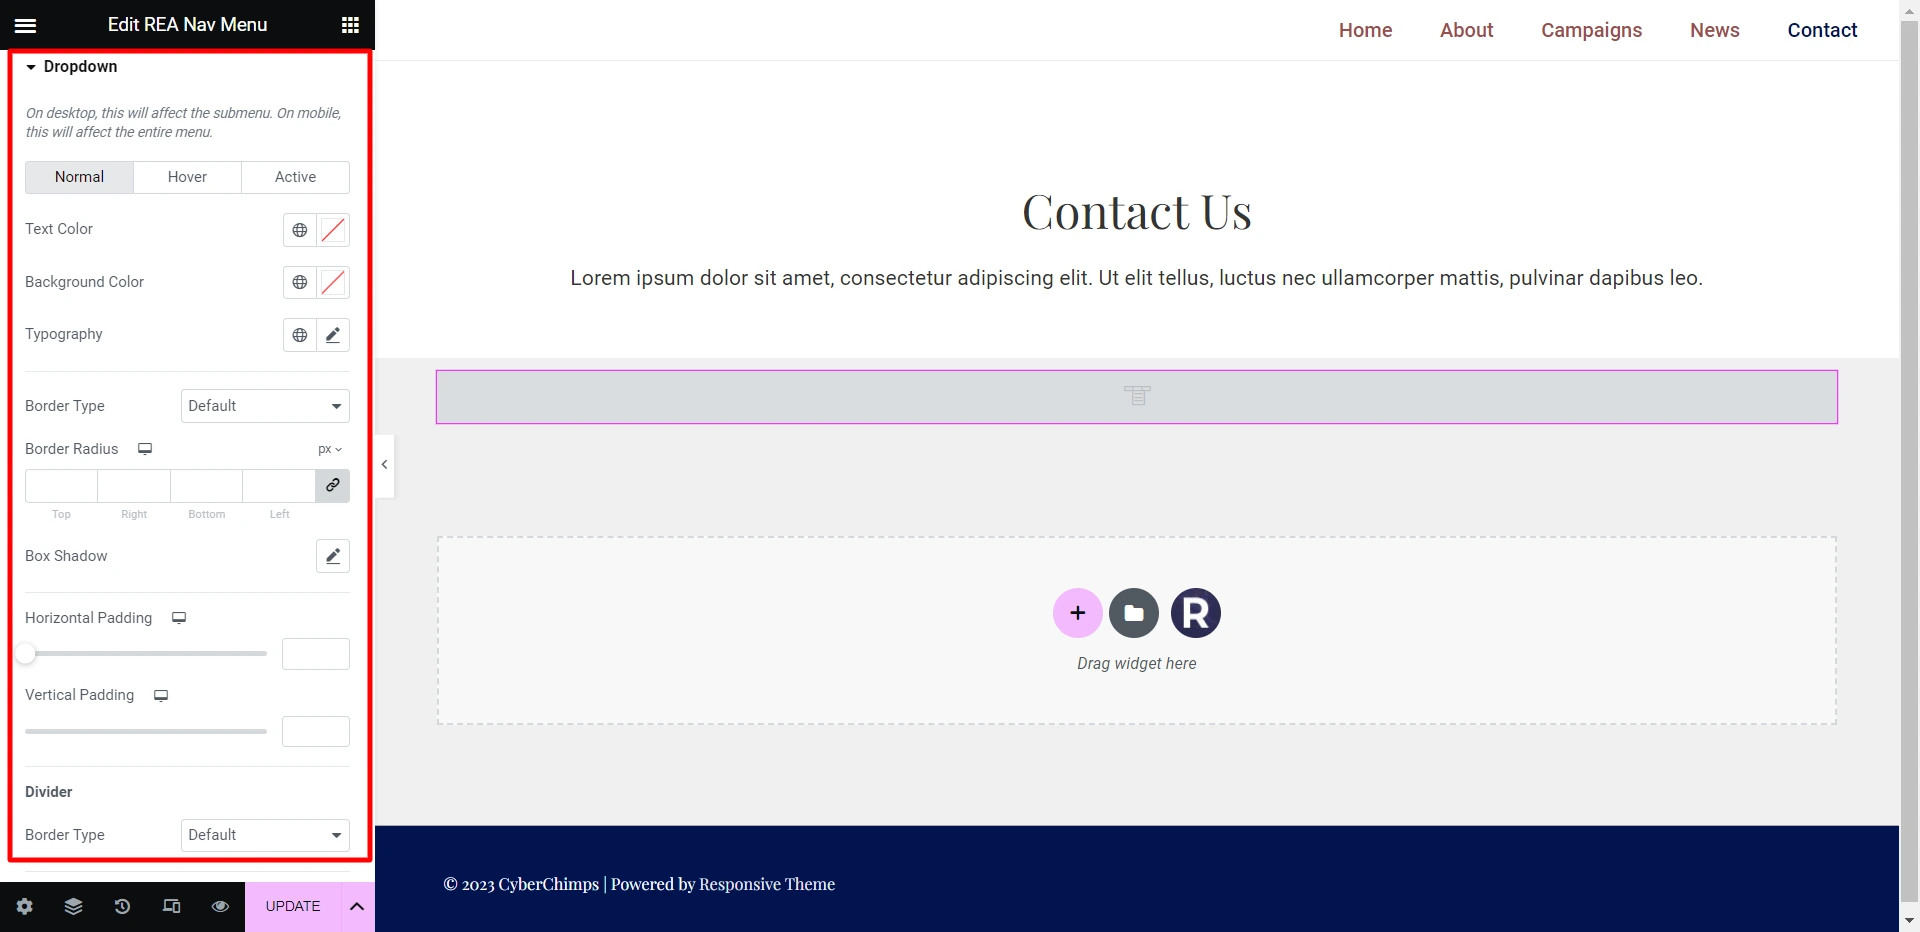
| Dropdown | – Text Color – Background Color – Typography – Border Type – Border Width – Border Color – Border Radius – Box Shadow – Horizontal Padding – Vertical Padding – Divider – Distance |
Toggle Button:

| Toggle Button | – Color – Background Color – Size – Border Width – Border Radius |
FAQ
Yes, you can add slider in Elementor for free using plugins like Responsive Addons for Elementor.
You can place a slider in headers, sections, landing pages, or anywhere using Elementor’s drag-and-drop editor.
You can display images, text, videos, buttons, and promotional content inside an Elementor slider.
The top-level navigation of a website is called a menu or a navigation bar (navbar). These links allow users to move through different pages or screens. On larger websites, there may be instances where multiple links will get stored under one main link, creating a dropdown menu.
1. Open your WordPress dashboard. For this section, we assume that you already have a WordPress account.
2. Click Appearance > Menus.
3. Write a menu name.
4. Click the Create Menu button.
5. Add categories, custom links, posts, and pages to the menu.
6. Save the menu.
7. Publish the menu.
Conclusion
Now that you understand how to create a navigation menu with Elementor, it’s time to create an attractive-looking one for your site.
Responsive Addons for Elementor plugin is loaded with a variety of customization options that effortlessly allow you to create fully functional menus without a single line of code.
If you’ve enjoyed reading this article, don’t forget to check out our latest articles:
- How to Create a WordPress Mega Menu for Your Website?
- Best WordPress Starter Templates to Build Websites Fast
- How to Create a WordPress Dropdown Menu in 15 Minutes for Your Website
Want to start building your own website? Grab the REA plugin, Elementor, and the Responsive theme now!