Summary
The article explains how Elementor Image Optimizer streamlines image optimization in WordPress. By reducing file sizes and improving load times, we can create fast, responsive websites that engage visitors and perform better in search engines.
To use Elementor image optimizer install and activate Image Optimizer by Elementor. Explore the settings and click on Connect Now to connect image optimizer to your Elementor account. Now select Optimize now to optimize your selected images.
Do you want to learn how to use Elementor Image Optimizer?
In today’s digital world, website speed is crucial for user experience and search engine rankings. One of the most significant factors affecting website speed is image size.
Large images can significantly slow page loading times, increasing bounce rates and lower search engine rankings.
Fortunately, Elementor, the popular WordPress page builder, offers a powerful tool to optimize your images: the Elementor Image Optimizer.
In this article, we will explain all the settings, how to use this plugin and its benefits.
So, let’s dive in!
Responsive Addons for Elementor is the Best Elementor Addons plugin – Get it for free!
What is Elementor Image Optimizer?
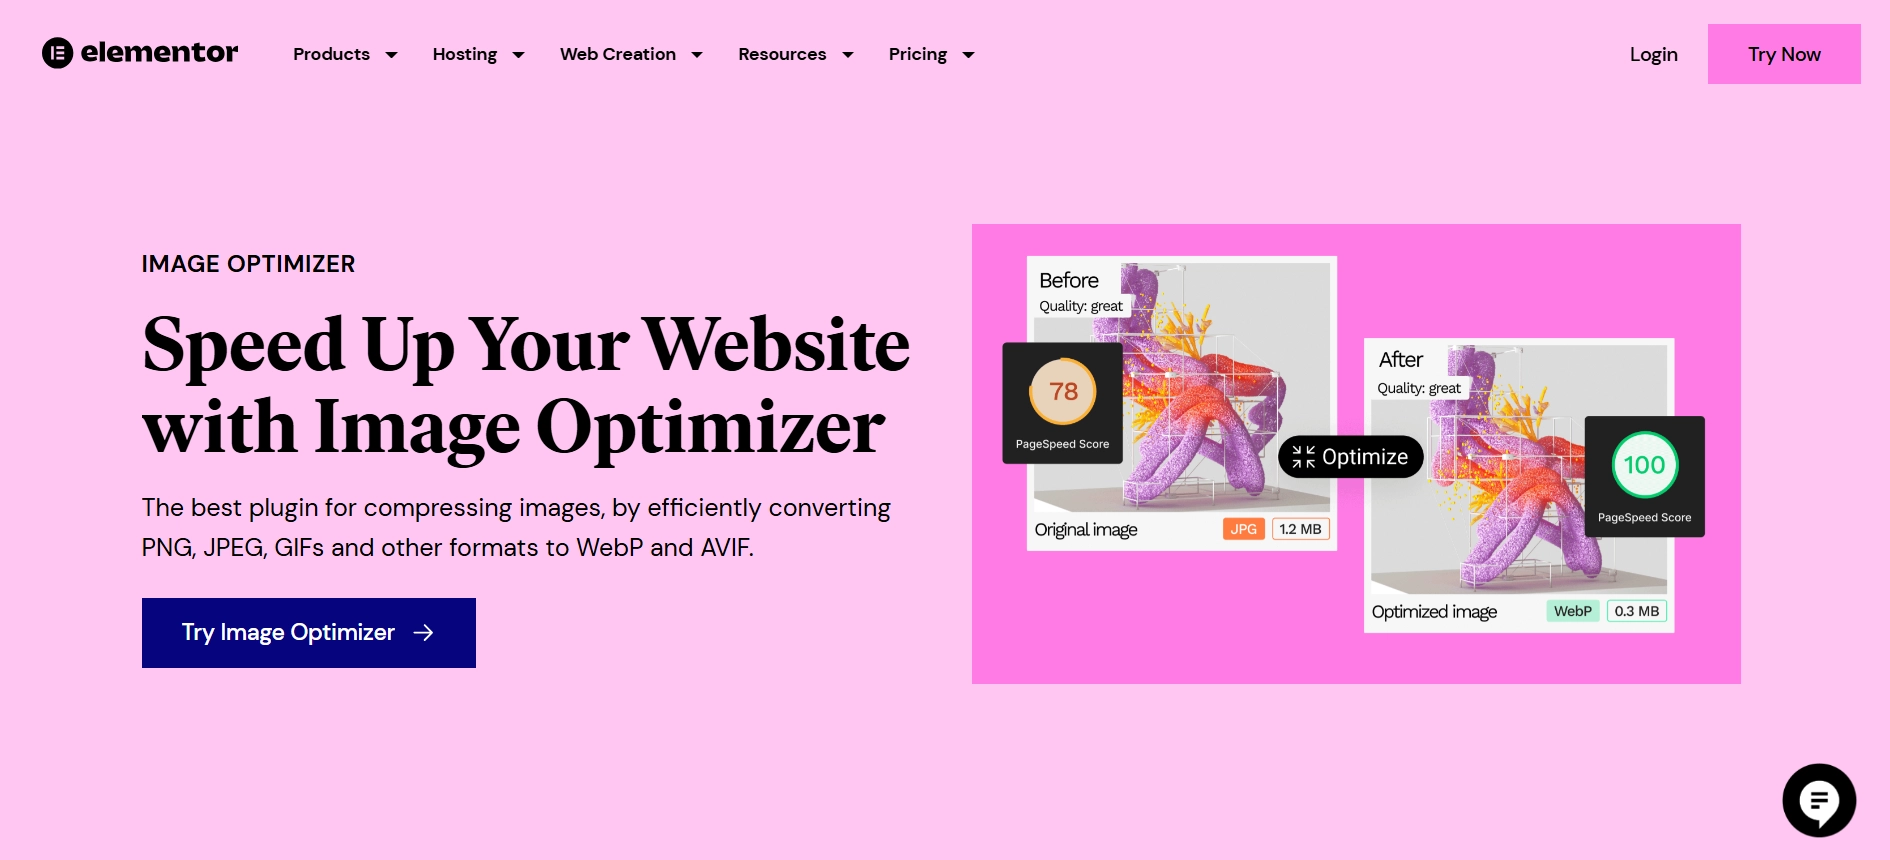
Elementor Image Optimizer is a plugin offered by Elementor Page Builder that allows you to compress and optimize images directly within the editor to improve page loading speed.
This plugin compresses images to reduce file size while maintaining quality. By optimizing images, websites can load faster, improve user experience, and potentially rank better in search engine results.
Additionally, it can help reduce bounce rates and enhance website security by minimizing image loading times. This tool is valuable for website owners and developers who want to boost their site’s speed and effectiveness.
Benefits of Using Elementor Image Optimizer
Image optimization has many advantages toward page load speed, user experience, and SEO performance.
Let’s explore the importance of image optimization and how it can positively affect your visibility on the internet.
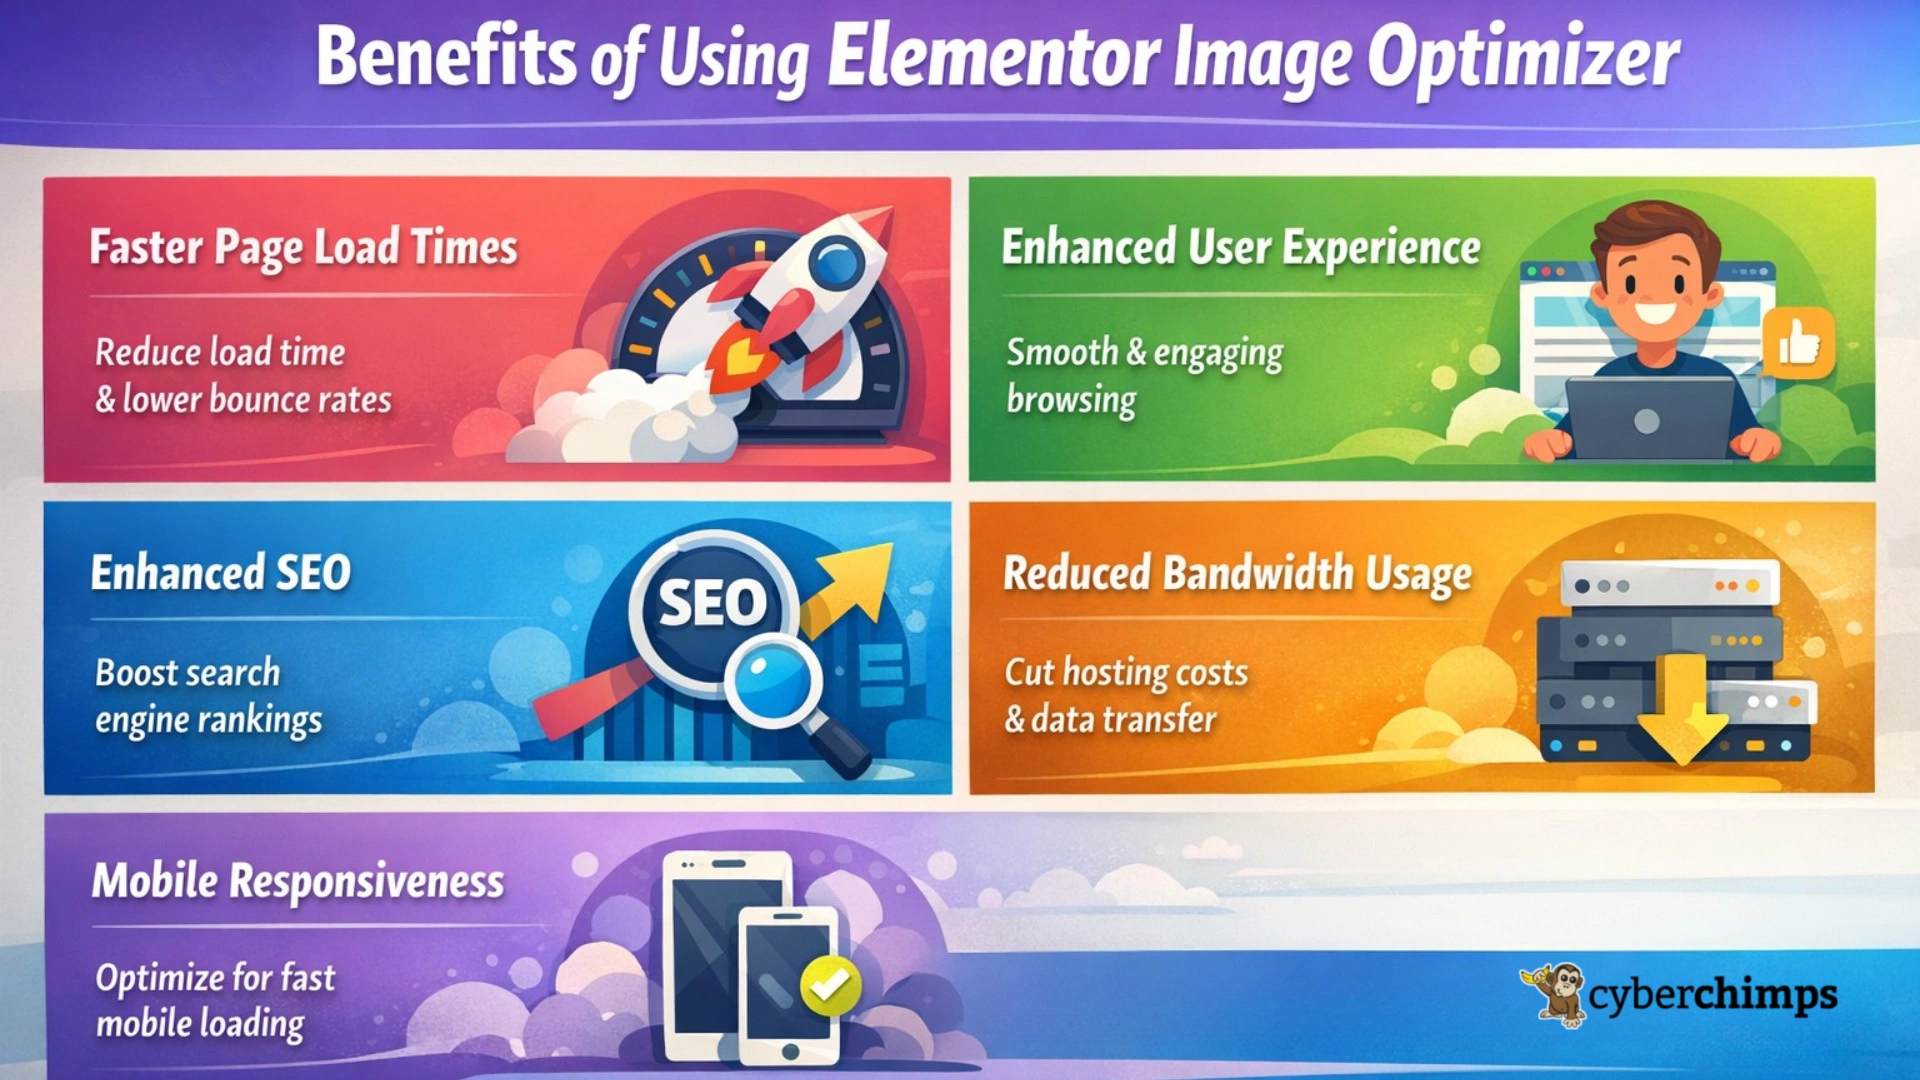
1. Faster Page Load Times
Image optimization has an immediate effect in page-load time . This is because large and poorly optimized images carry a great weight that impacts negatively on your website by increasing the bounce rate and driving away visitors.
2. Enhanced User Experience
Fast and smooth website navigation is engaging to a visitor. The above-friendly browsing experience guarantees satisfied users and high retention rates.
3. Enhanced SEO
Page speed is among the factors that search engines take into consideration in ranking websites; SERPs love websites that load faster.
4. Reduced Bandwidth Usage
Image optimization is a key to cutting down on bandwidth usage and hosting costs so less data will be transmitted between the user’s browser and the server.
5. Mobile Responsiveness
Along with other mobile users, they tend to have less bandwidth and slow internet connections, all of which require image optimization. Optimizing images also allows mobile devices to load faster, trying to keep up with the increasing number of mobile users.
You can also check out this article if you want to learn more about Elementor page speed optimization: Quick Ways To Optimize Your Elementor Page Speed
Best Practices for Image Optimization
Below are some techniques to optimize the images on your website:
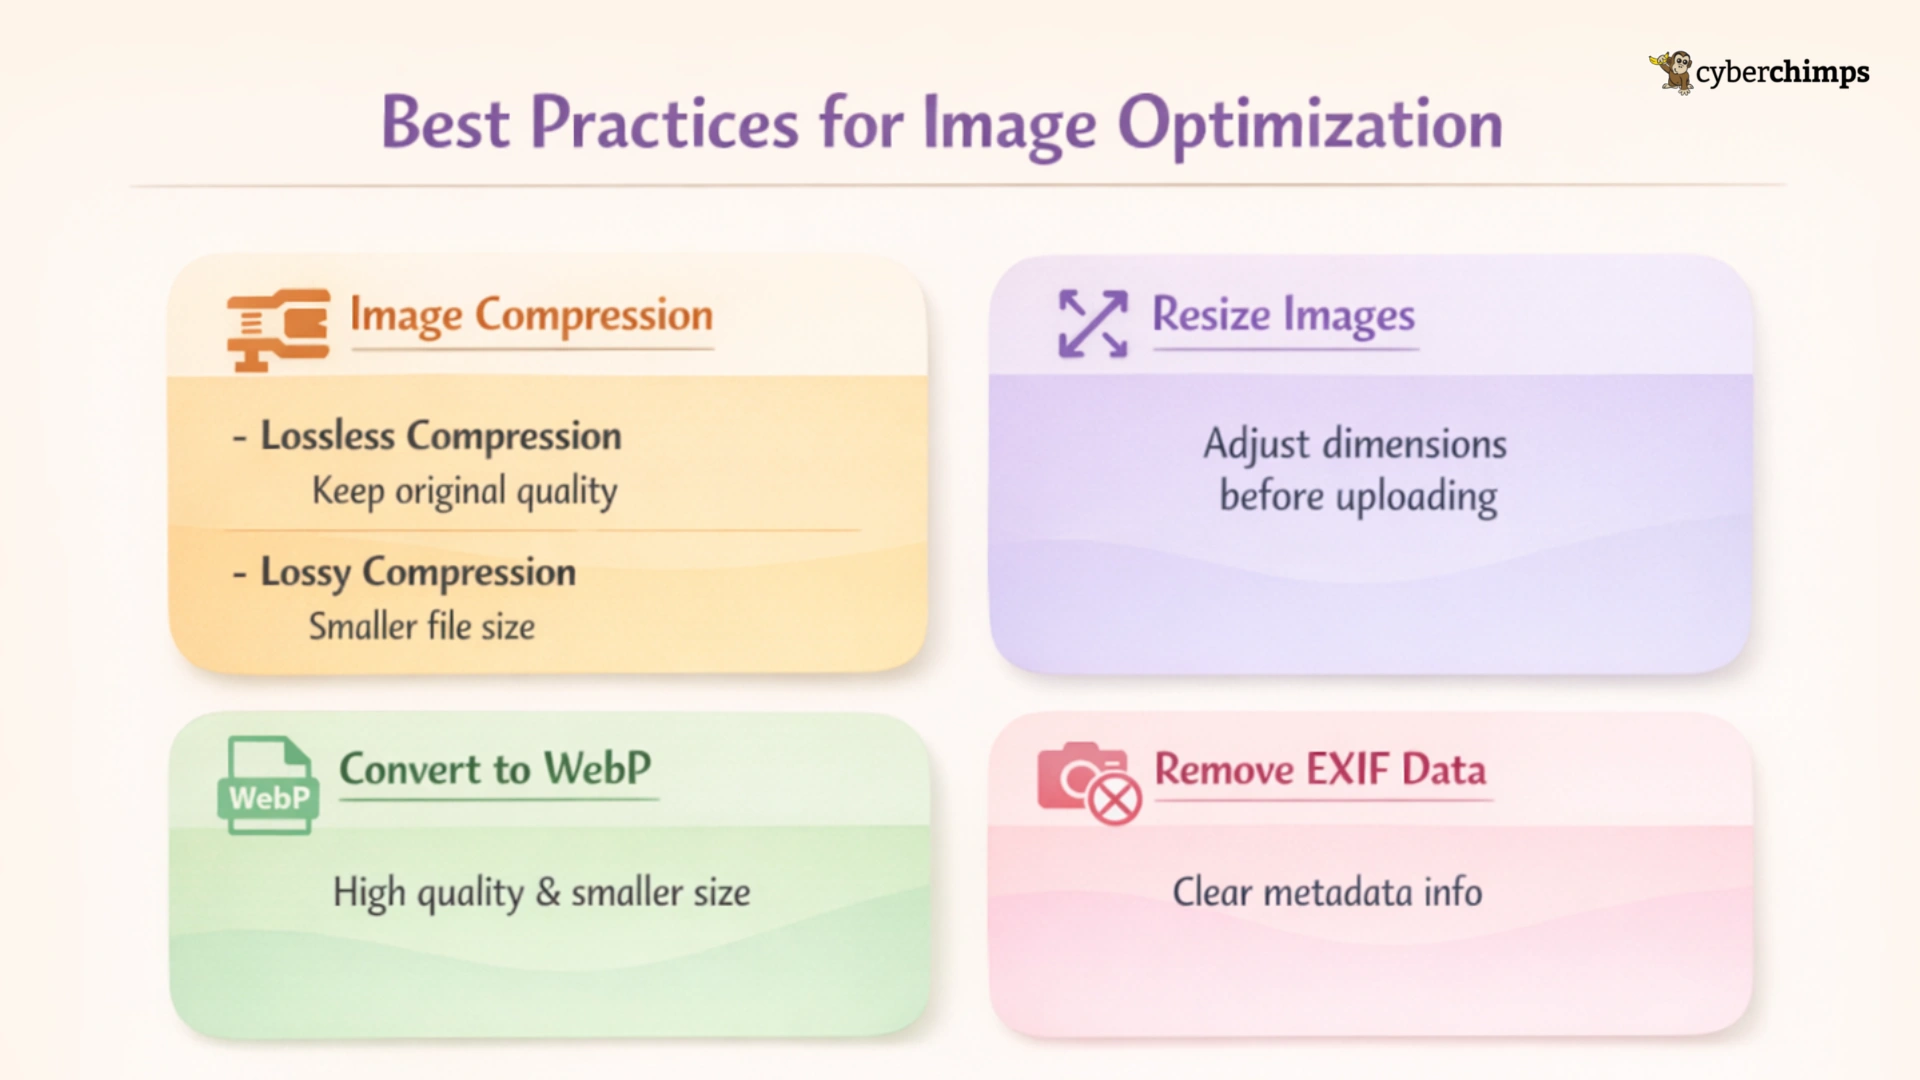
1. Image Compression
The image optimization algorithm consist of two types of compression procedures to balance the reduction of file sizes with good quality. They are:
- Lossless Compression: This compression keeps the original image quality since it does not alter or discard any integrated data. However, it eliminates unnecessary or redundant data to achieve maximum size reduction.
- Lossy Compression: In this kind of compression, all irrelevant data is removed from the file to achieve extremely lightweight images for maximum streaming.
2. Resizing the Images Prior to Uploading
The Elementor Image Optimizer gives you the chance to resize larger images in dimensions or pixel sizes. Users can select maximum image pixel width since large images can overload the server.
3. Convert to WebP for Better Optimization
This image optimization for Elementor lets WebP image conversion, which has remarkable image size optimization while keeping very high image quality.
4. EXIF Metadata
EXIF (Exchangeable Image File Format) metadata includes all such information stored within an image file about the camera settings, conditions around, and other technical aspects. This data helps with the reduction of file size without compromising quality, benefiting speed and load time.
You can check out JPG vs PNG vs WEBP: Which Image Format is Best For WordPress for greater insight into which image format fits you best.
How To Use Elementor Image Optimizer

Let’s see how to install and start using the Image Optimizer plugin.
How to Install and Activate Elementor Image Optimizer
To install and activate the plugin, follow this process:
1. Log into your WordPress dashboard and go to Plugins > Add New Plugin.

2. Then, search for Image Optimizer by Elementor in the search bar.
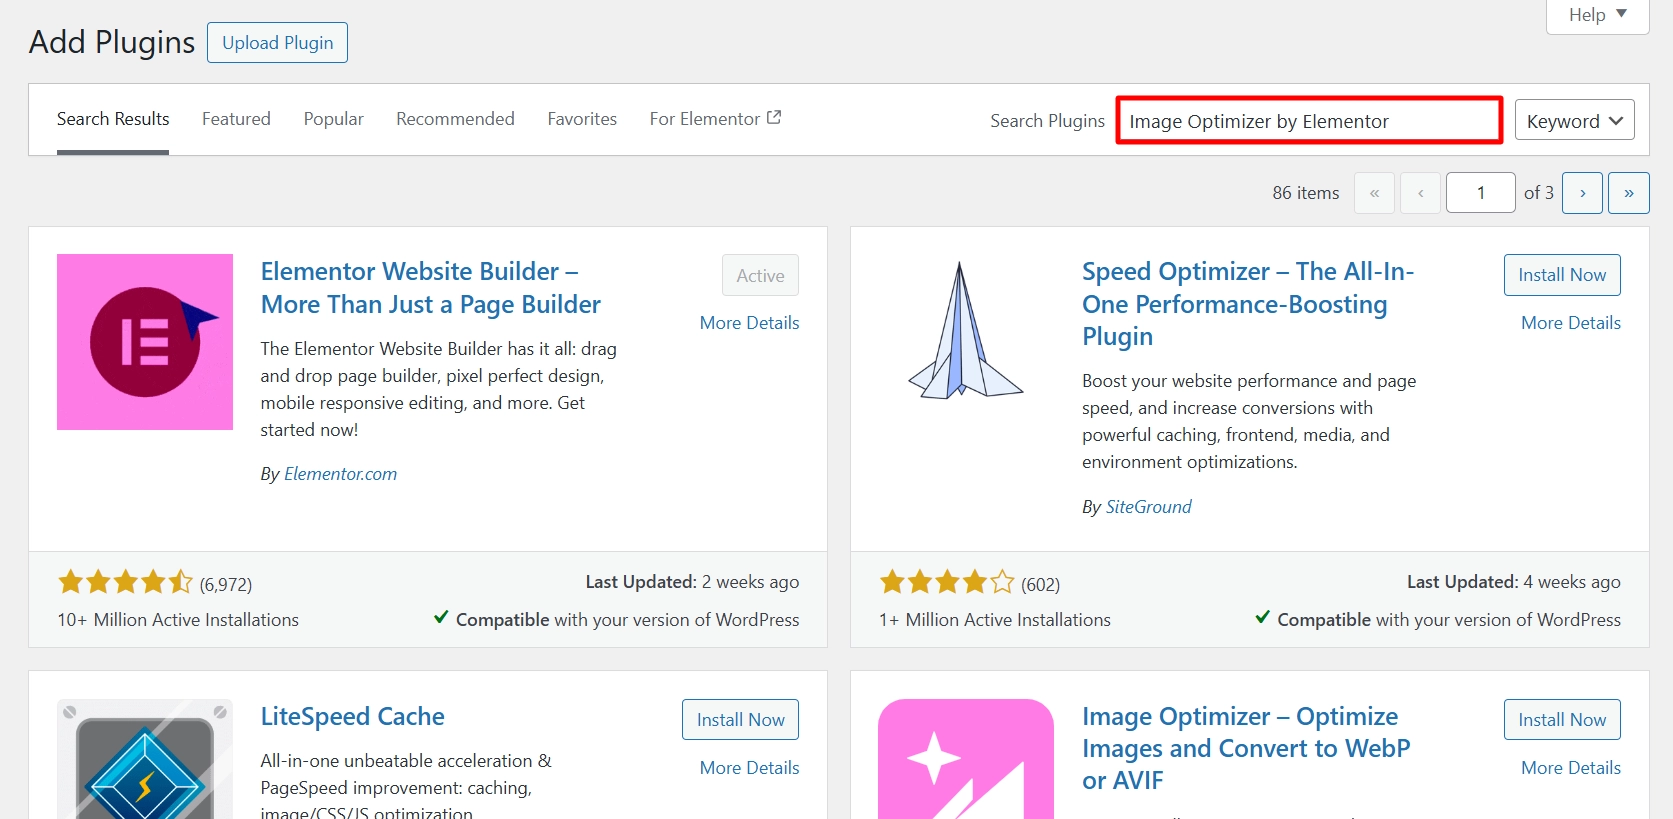
3. Now, when you find this plugin, click Install Now, and after the installation is complete, click Activate.
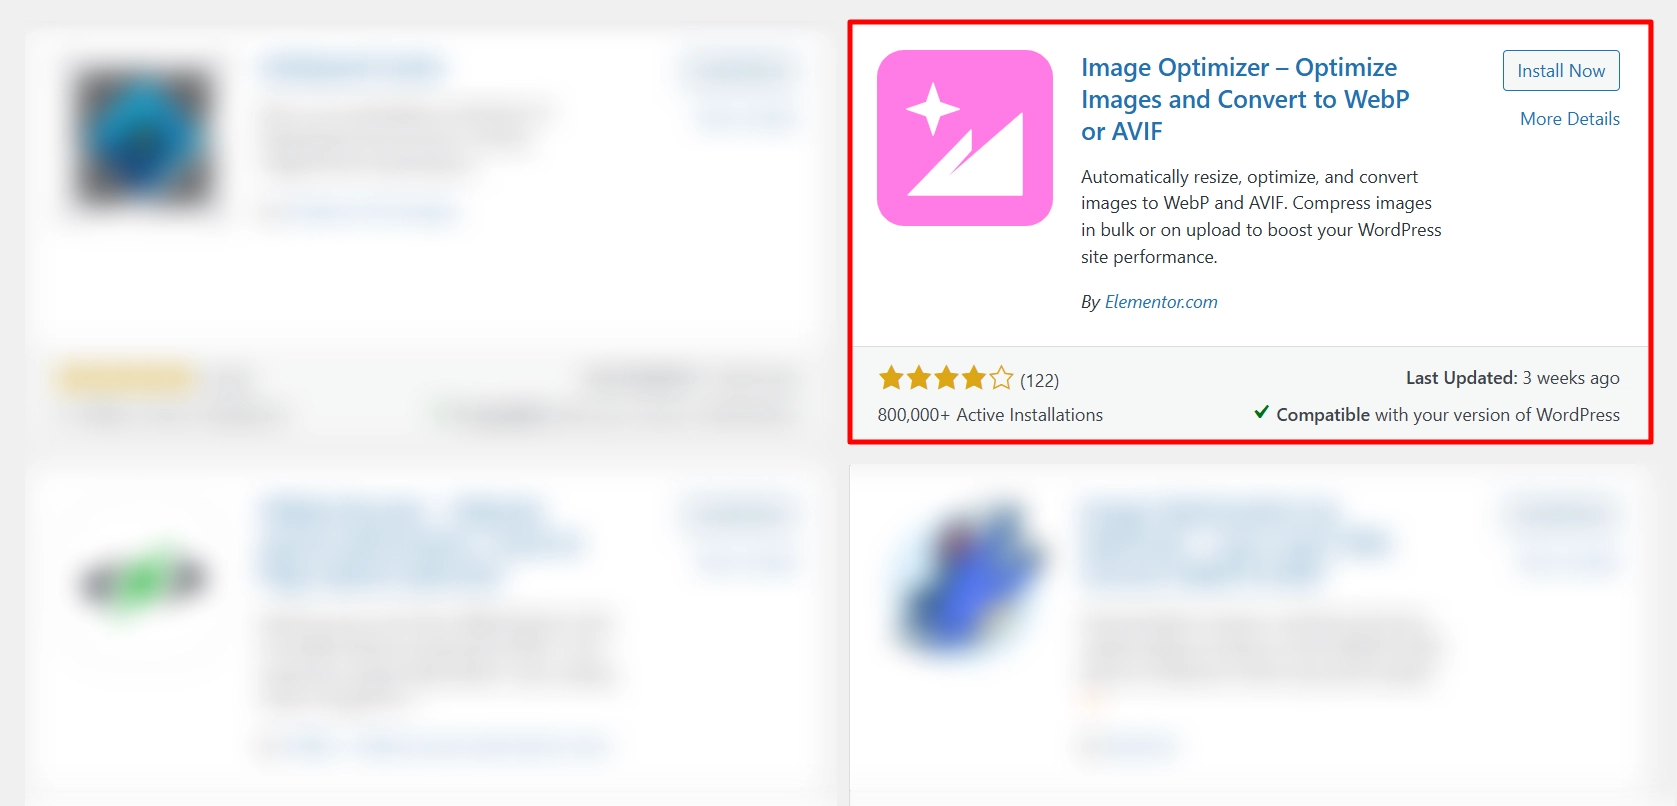
The plugin is now successfully activated and ready to use!
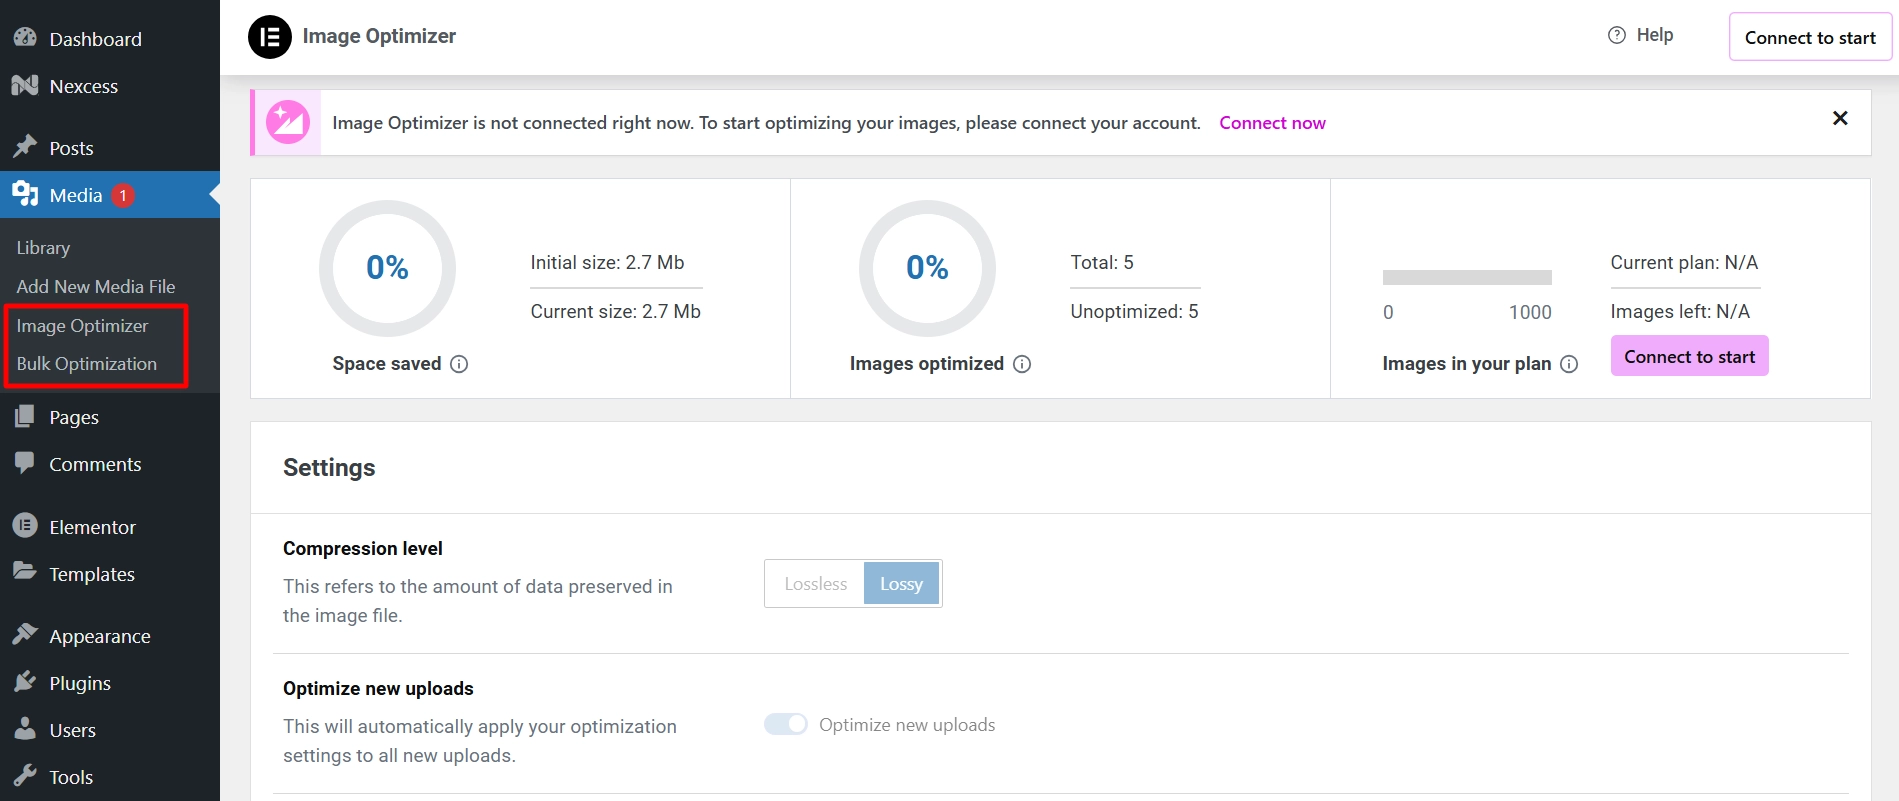
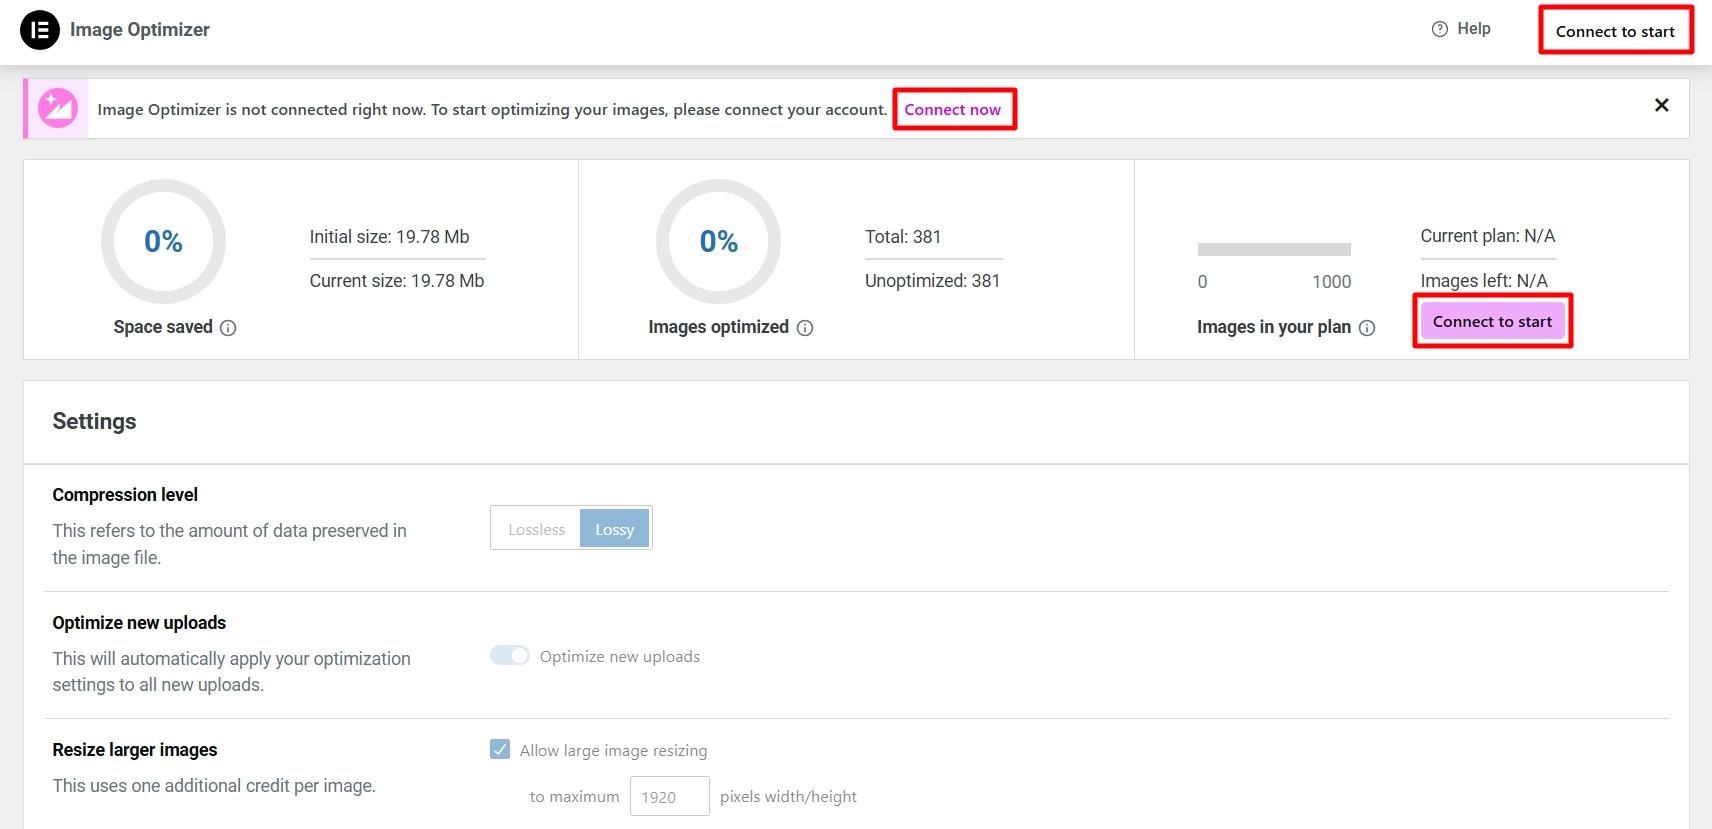
Explore the Image Optimizer Settings
Settings is where you configure the Image Optimizer Plugin and determine its default behavior.
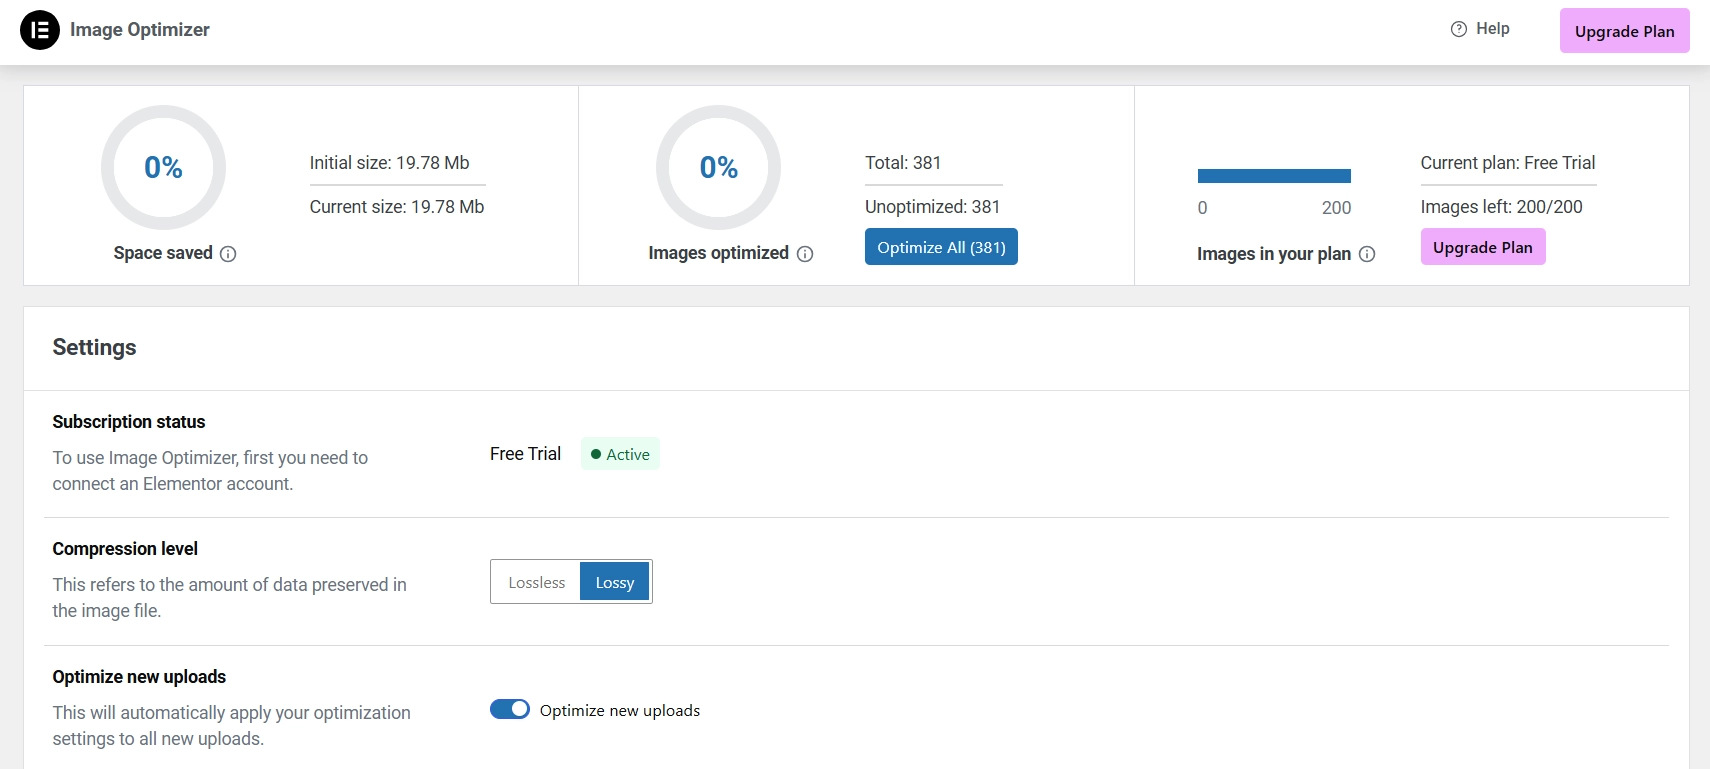
Control Panel
You will see vital information in the top part of the dashboard and the Settings configuration below.

- Space Saved: This section displays the space you’ll save by optimizing images, which varies based on your selected settings.
- Images Optimized: Tracks the number of images in your media library and how many have been optimized.
- Images in Your Plan: Each Elementor Image Optimizer plan has a limit on optimizations. The control panel shows how many images you’ve optimized and how many are left. Click Upgrade to increase your limit or Renew Plan if your subscription has expired.
Settings
The Settings section is located below the Control Panel.
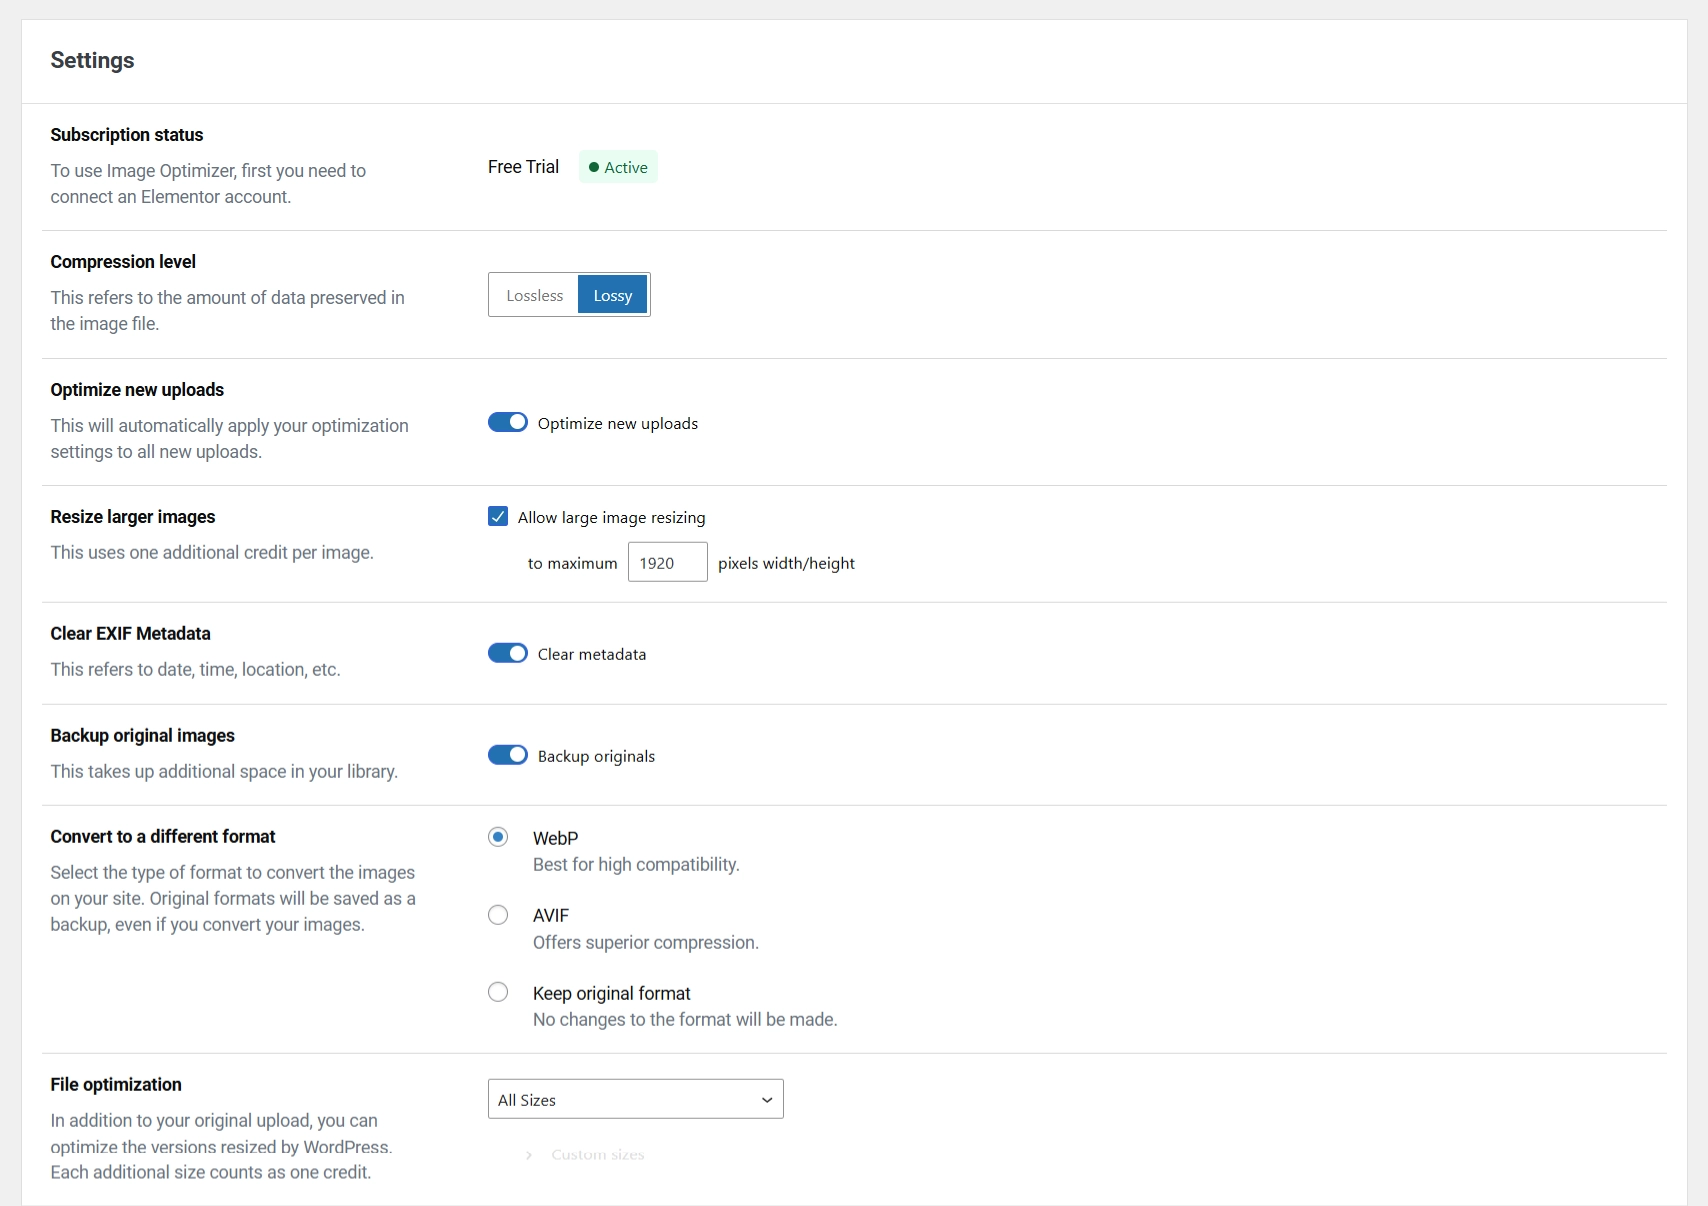
- Subscription Status: This section shows the subscription plan selected.
- Compression Level: Choose one of the following compression options:
- Lossless: Maintains original quality while reducing size.
- Lossy: Reduces size significantly at the cost of some quality.
- Optimize New Uploads: Enable this option to optimize images uploaded to your Media Library automatically. This is active by default.
- Resize Larger Images: Set a maximum size, in pixels, for images. The Optimizer will resize images that exceed this limit, which is set to 1920 pixels by default.
- Clear EXIF Metadata: Images often contain metadata that can increase file size. Enabling this option will remove some of that data to improve loading times. This feature is active by default.
- Backup Original Images: When enabled, the Optimizer saves a copy of the original image, allowing you to use it instead of the compressed version. This option is active by default and does not affect website performance but does use server space.
- Convert to a Different Format: You can convert images to the following formats during compression:
- WebP: A widely supported format optimizes JPEG images when enabled (active by default).
- AVIF: Offers efficient compression and supports advanced features like transparency and high dynamic range.
- Keep Original Format: No changes will be made to the format.
- File Optimization: When uploading images to WordPress, multiple sizes are created: Thumbnail, Medium, and Full Size. Use the dropdown to select which sizes to optimize. Each optimized size counts separately, with all sizes optimized by default.
Advanced Actions
Expand the Advanced Actions section to access tools that developers may use.
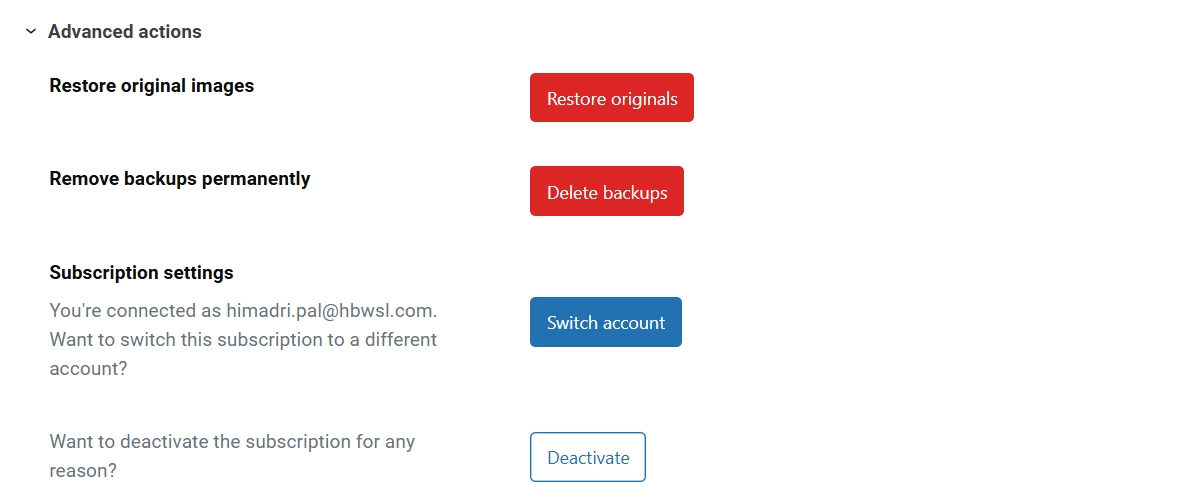
- Restore Original Images: Replace your site’s optimized images with their original versions.
Warning: This action is irreversible, so we recommend backing up your website first.
- Remove Backups Permanently: By default, the Optimizer saves a copy of the original image alongside the optimized version. While this does not affect your website’s performance, it occupies server space. This option lets you delete these original images to free up server space.
Warning: Deleting backups is irreversible, so it is highly recommended that you back up your website first.
- Subscription Settings: In this section, you can switch to another Elementor account, disconnect this site from an Elementor account, or verify your current connection status.
- Want to deactivate the subscription for any reason? The Optimizer is linked to your subscription. Click “Disconnect” to unlink your account.
How To Connect Image Optimizer
After installing the Image Optimizer, you need to connect your account. To do this, you will require:
- An Elementor account
- A connection between the Image Optimizer and your Elementor account
If you do not have an Elementor account, navigate to Media > Image/Bulk Optimizer to create one.
Click Connect Now or Connect to start on the dashboard’s right side.
You will be prompted to create an Elementor account.

After you create your account, click Connect & Continue.
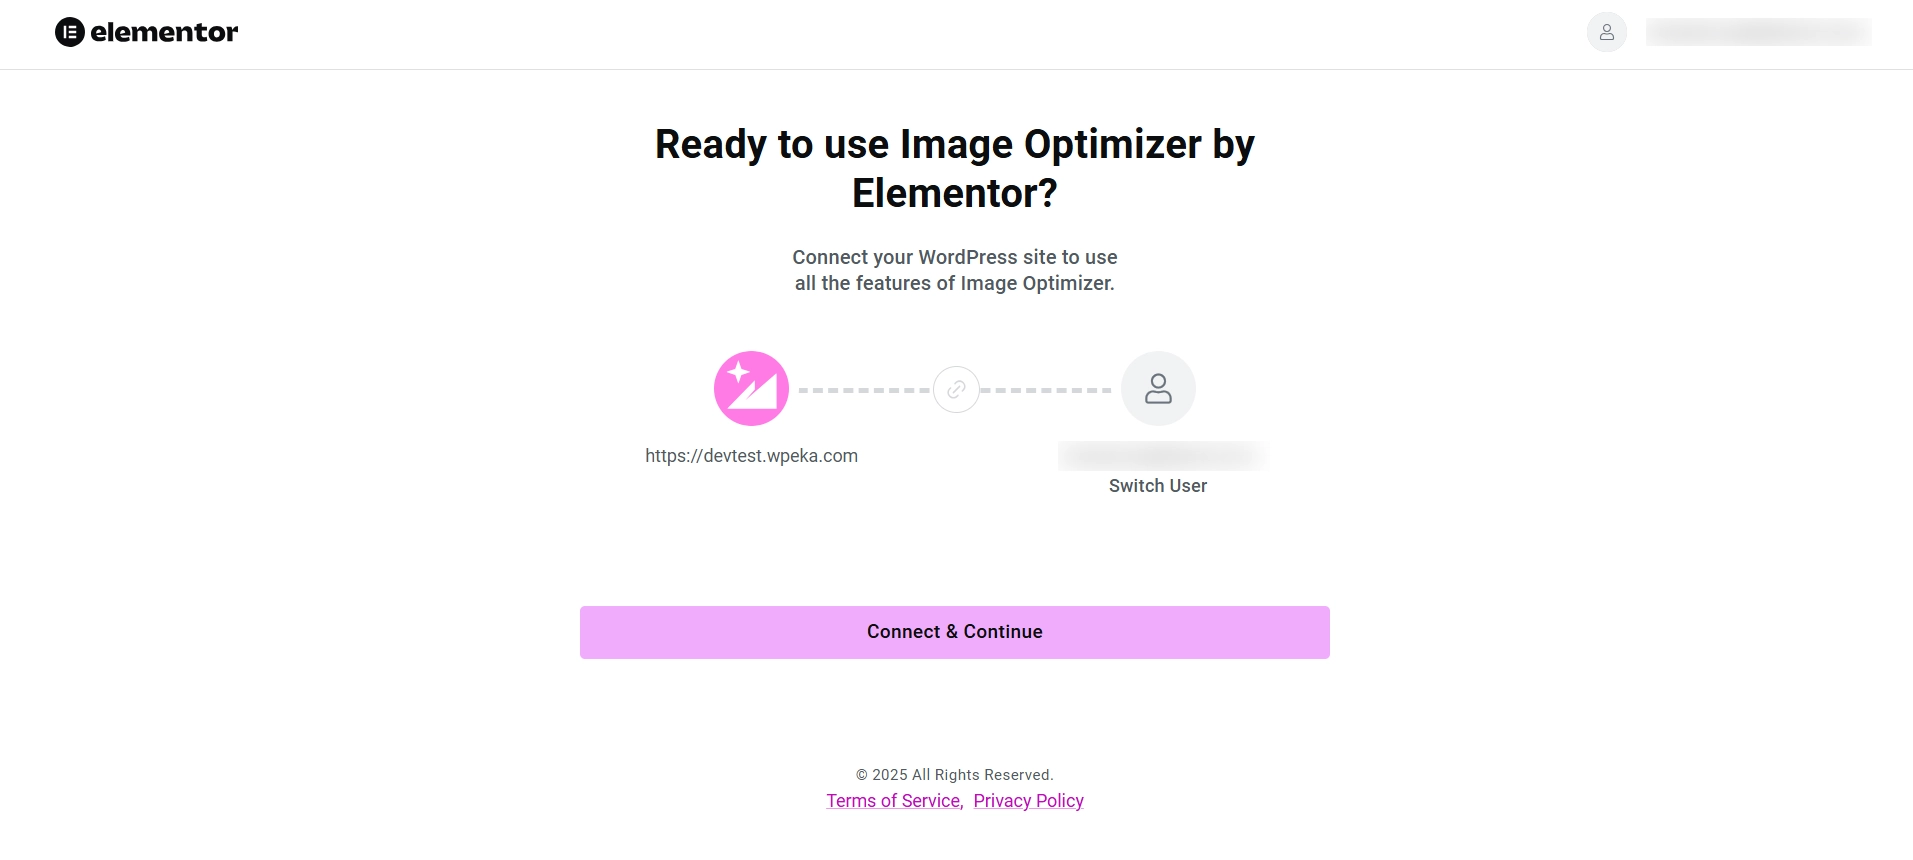
Here, fill in your details and proceed with Connect & Continue.
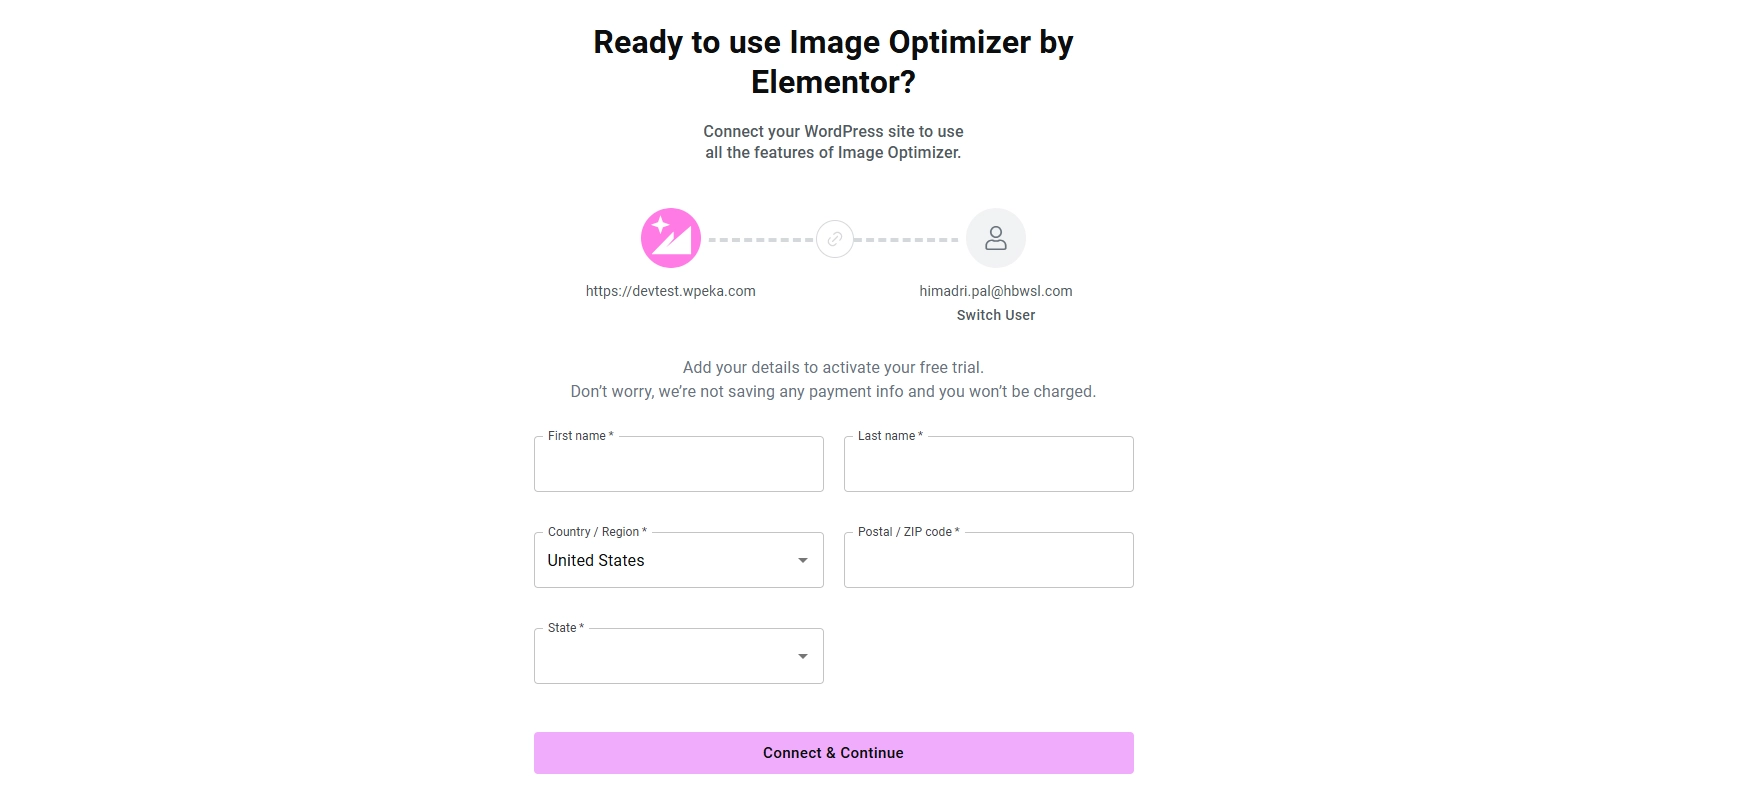
And done! You are now connected and ready to optimize the images.
Optimize a Single Image
When you’re done connecting your account, let’s see how to optimize a single image.
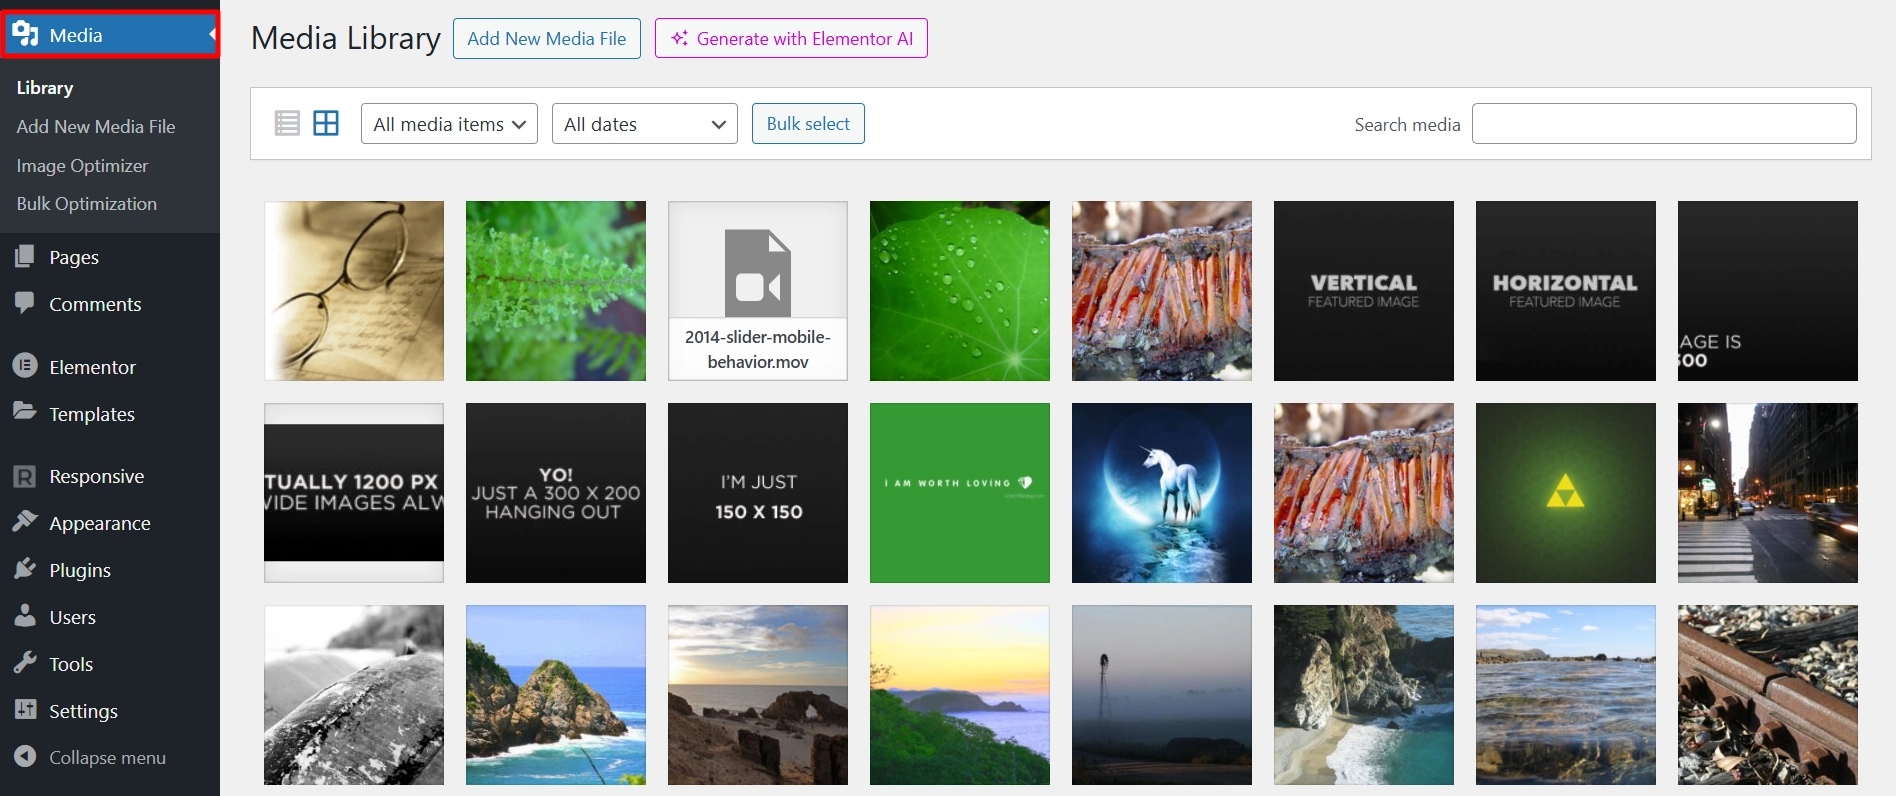
Go to Media and select the image you want to optimize.
On the right panel, click on Optimize Now.
In addition to the standard editing options, you will find the following:
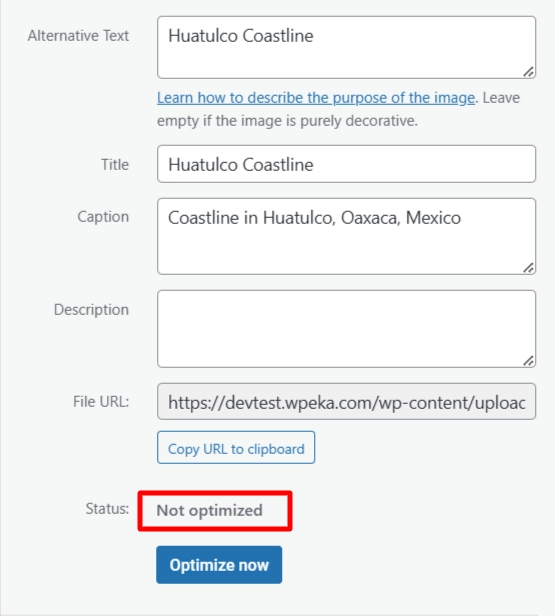
Status: Not Optimized
Click Optimize Now to start optimizing the image.
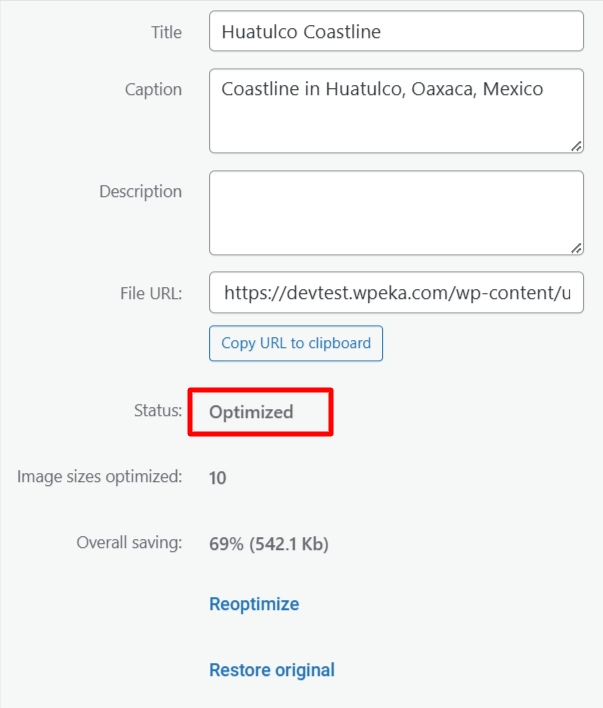
Status: Optimized
Click Reoptimize to optimize it again
Click Restore Original to undo the optimization.
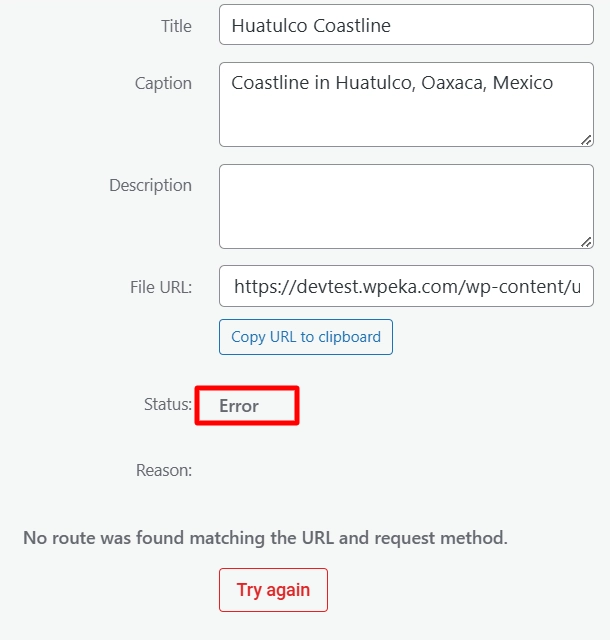
Status: Error
Please address the reason for the failure and try optimizing again.
Optimize Multiple Images
If you want to optimize all images in your media library, you can do that in just a few seconds.
For that, go to Media > Bulk Optimization.
Click Start to optimize all images in your media library. The optimizer will begin working and display progress on the screen.
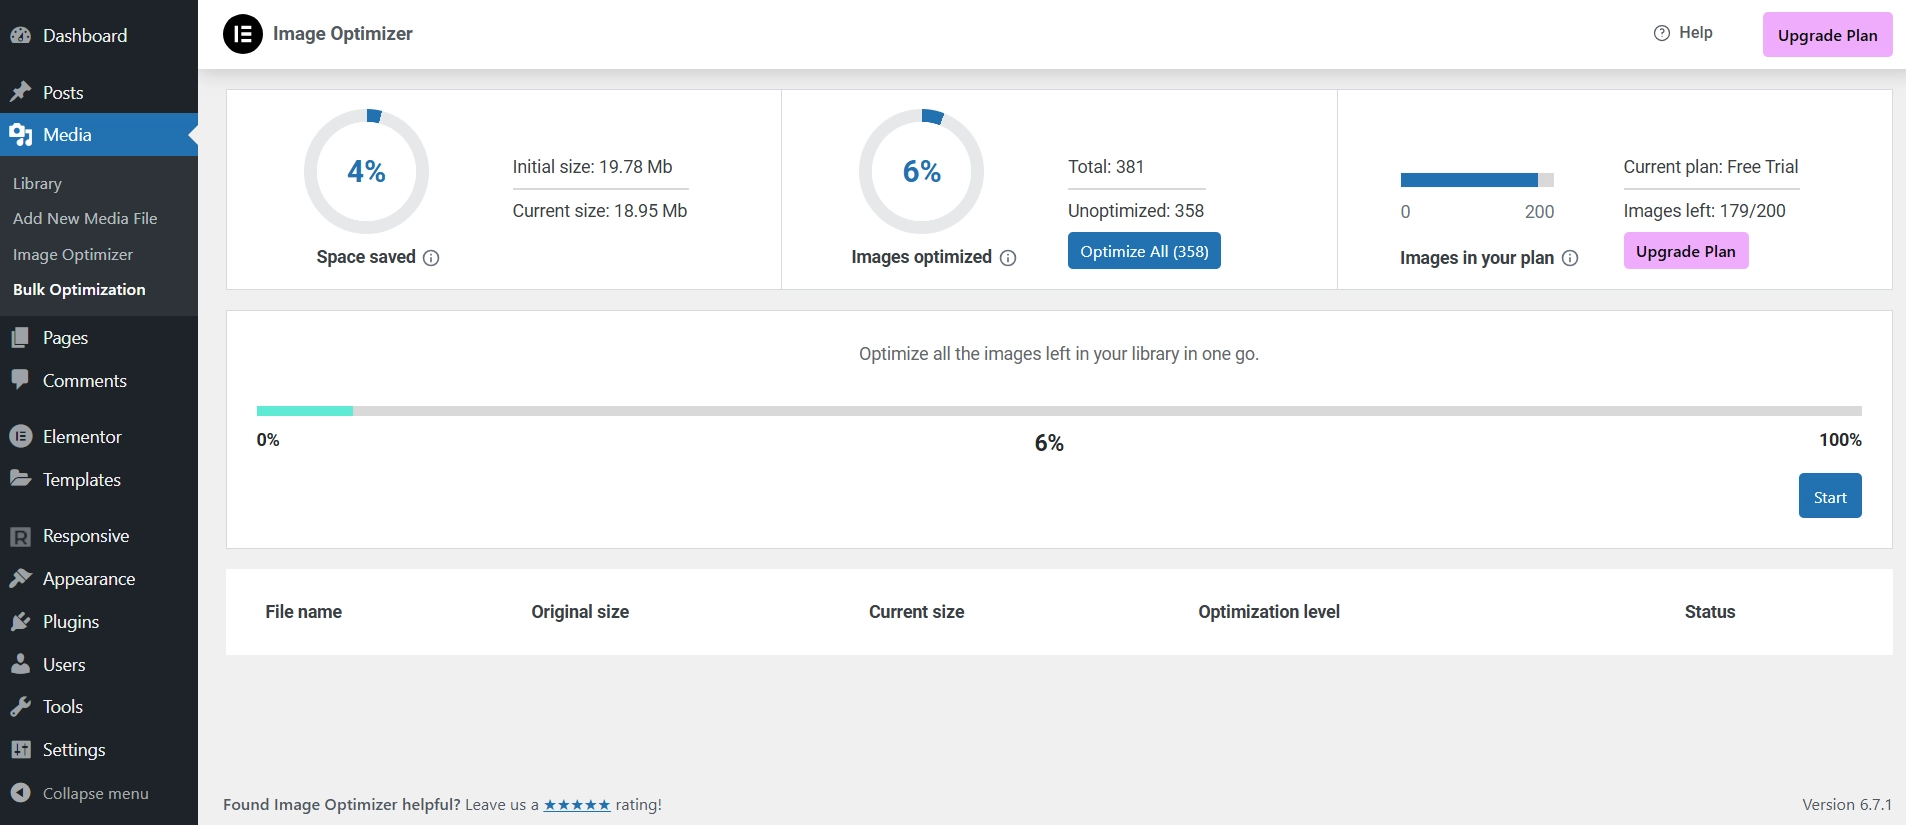
And thats it! This is how you can optimize all your web images with ease and speed up your website.
FAQ
Elementor Image Optimizer aims to minimize image size while maintaining acceptable visual quality. However, excessive compression can sometimes lead to noticeable quality degradation.
Image optimization is typically included in the free version of Elementor.
Yes, Elementor Image Optimizer allows bulk optimization, enabling you to compress multiple images at once directly from the media library.
Conclusion
Understanding Elementor’s functionalities and incorporating them into your content creation process can enhance your website’s visual appeal and improve loading times.
As users increasingly prioritize fast and engaging experiences, optimizing images with Elementor is a valuable strategy.
The Elementor Image Optimizer tool streamlines your workflow and boosts your website’s performance, keeping your audience engaged.
Remember to experiment with the settings and find the optimal balance between image quality and file size.
If you’d like to read more exciting blogs like this, go through these:
- How to Add Content Ticker To Your Elementor Website
- How to Add Fancy Text To Your Elementor Website
- How To Add Dual Color Header To Your Elementor Website
- How to Fix HTTP Image Upload Error in WordPress For Beginners
Additionally, you can check out Responsive theme by Cyberchimps to easily create versatile websites.